By Mattia Ciollaro | November 28, 2017
In this guest post, Mattia Ciollaro writes about how to get started with the Luigi task runner, and highlights his own contribution to Luigi through a special use case geared towards running Jupyter notebooks in your workflows. Mattia holds a PhD in statistics from Carnegie Mellon University and is working on improving American healthcare at Spreemo Health. You can get in touch with him via LinkedIn.
Data Science meets plumbing
In many data science projects, we often start by developing code to solve specific small tasks. Most often, once we have solved enough of these small tasks, we desire to cleverly “glue” them together to solve a bigger task. Eventually, in many cases, the whole project is condensed into a pipeline of tasks which depend on each other in a potentially complex way.
Consider the example of the very popular Kaggle competitions. In a Kaggle competition, your final goal is to build a model to make accurate predictions (or the most accurate predictions, if you’re in it for the glory or the money!) of some target variable using a set of input features. Most often, you can break down a Kaggle competition into small tasks. Something along the lines of:
-
get the data from the Kaggle competition page
-
create some summary visualizations to explore the available data
-
clean and normalize the data; this may include operations such as merging multiple datasets into a single table, imputing missing values, encoding non-numeric features, etc.
-
model fitting
-
final model evaluation
-
create the final submission file with your predictions.
These tasks may be broken down into even smaller subtasks. For instance, you may argue that 4. can be further decomposed into:
-
split the available data into training, validation, and test sets
-
scale the features
-
use the data splits to fit and evaluate multiple models
-
combine these models in an ensemble or stack them together.
While this list is not necessarily the most general or representative for any Kaggle competition, it highlights the fact that many data science projects consist of inter-dependent tasks that you ideally want to execute seamlessly and flawlessly.
Today there are several libraries which help us simplifying the process of building and maintaining pipelines of data science tasks. A short list of well known ones includes Airbnb’s Airflow, Apache’s Oozie, LinkedIn’s Azkaban, and Spotify’s Luigi.
One that I really enjoy and that I routinely use is Luigi, which is conveniently packaged as a Python module. Luigi was open-sourced in late 2012, and yes… it is named after the world’s second most famous plumber of all times! Luigi is very simple to use and customize once you get familiar with it. After reading this post, you will know enough about Luigi to start using it in your own work, even if you are completely new to it. And the fun does not stop there! In the second part of the post, we will dive a little deeper and learn how to combine Luigi and Jupyter notebooks.
Fun fact: I started working with Luigi when Intoli’s own Andre Perunicic and I were colleagues at Spreemo Health. There, Andre introduced Luigi as the main data pipeline tool for the Data Science team. Within the team, we now leverage Luigi’s capabilities to streamline our ETL processes, as well as our bigger data analytics, modeling, and prediction tasks.
Setting up your environment
If you want to follow along and execute the code presented in this post, here is what you need to do to set up your environment:
-
Make sure Python 3 is installed on your machine. On Mac, you can install it using Homebrew with:
brew install python3This is the distribution of Python that I will use on my MacBook for this post. If you are using Linux, Python 3 is most likely the default system Python already.
-
Clone the companion
luigi_tutorialrepository with:git clone git@github.com:mattiaciollaro/luigi_tutorial.git -
cdto the root of the new repository,luigi_tutorial. -
Create a new virtual environment named
.envwithvirtualenv .env --python=/usr/local/bin/python3which will set the Homebrew Python 3 as the interpreter for the tutorial. You can change the value of the long flag
--pythonif you want to use a different distribution of Python 3. -
Activate the newly created virtual environment with:
source .env/bin/activateLater, you can turn this off by executing
deactivate. -
Install the required modules:
pip install -r requirements.txtThis may take a little while to complete!
-
Run the
setup.pyfile:python setup.py -
Follow the instructions that appear on the Terminal screen to set some environment variables for the project in your
~/.bash_profile. In particular, you will be asked to add something like thisexport PYTHONPATH=$PYTHONPATH:/Users/mattiaciollaro/Git/luigi_tutorial export LUIGI_CONFIG_PATH=/Users/mattiaciollaro/Git/luigi_tutorial/luigi/luigi.confto your
~/.bash_profile. Here is one way to do this: highlight with your mouse the twoexportstatements and copy them withCmd + Cto your clipboard; open your~/.bash_profilefile withnano ~/.bash_profile, scroll all the way to the bottom, and paste theexportstatements withCmd + V; finally, save the updated~/.bash_profilewithCtrl + Oand exitnanowithCtrl + X. -
Once you have added the required environment variables to your
~/.bash_profile, close the Terminal application. -
Open again the Terminal and
cdto the repositoryluigi_tutorial.
You are all set and we are ready to roll!
Note:
- All of the tasks presented in this post are in the repository’s
tasks.pyfile. If you are using the companion repository, there is no need to copy and paste: the tasks intasks.pyare ready to run. - Any output file produced by the tasks will be saved in the
outputfolder within the repository.
All of Luigi… nooot!

Luigi is a very flexible tool and offers a lot of functionality. In this section, we are going to discuss the basics and cover just enough material so that you will be able to keep learning by yourself and to start customizing Luigi to your own projects and use cases.
First of all, we need to launch the Luigi daemon. In the new Terminal window, let’s activate our virtual environment with
source .env/bin/activate
and then launch the daemon with
luigid
Next, open a new Terminal window and activate the virtual environment with source .env/bin/activate.
From now on, make sure that your virtual environment is active on any additional Terminal windows that you use.
A first simple task
We will start our data science plumbing activities by writing the simplest task ever! Here it is:
import os
import luigi

output_path = '/Users/mattiaciollaro/Git/luigi_tutorial/output/'

class TellMeMyName(luigi.Task):
    """
    An incredibly simple task that writes your name to a text file.
    """
    my_name = luigi.Parameter()

    def output(self):
        return luigi.LocalTarget(
            os.path.join(output_path, 'my_name.txt')
        )

    def run(self):
        with open(self.output().path, 'w') as out:
            out.write('Your name is %s' % self.my_name)
First thing, we are going to run this task with
luigi --module tasks TellMeMyName --my-name Mattia
to see what happens.
Once the task has successfully run, Luigi creates a short execution summary for us:
Scheduled 1 tasks of which:
* 1 ran successfully:
    - 1 TellMeMyName(my_name=Mattia)

This progress looks :) because there were no failed tasks or missing external dependencies
Awesome!
This task produced the my_name.txt in the repository’s output folder.
The file’s contents are:
Your name is Mattia
Thanks for the heads up!
Let’s examine our task in a little more detail.
First of all, Luigi expects you to declare any parameters whose values you want to specify from the command line as luigi.Parameters.
In our current example, the only luigi.Parameter is my_name.
Next, in the output() method, we tell Luigi that the output of our task is a text file named my_name.txt.
Roughly speaking, LocalTarget is Luigi jargon for “file” (hence the fancy return statement).
Finally, we implement the execution logic of the task in the run() method.
In TellMeMyName, run() simply writes the value of my_name to a text file.
Notice how we used the long flag --my-name Mattia to give a value to my_name when we executed the task from the command line with:
luigi --module tasks TellMeMyName --my-name Mattia
If my_name was hard-coded in the task (i.e. had we defined it without the luigi.Parameter declaration), we would not be able to assign an arbitrary value at run time.
This is precisely why we did not write the task like this:
class TellMeMyName(luigi.Task):
    """
    An incredibly simple task that writes your name to a text file.
    """
    my_name = 'Mattia'

    def output(self):
        return luigi.LocalTarget(
            os.path.join(output_path, 'my_name.txt')
        )

    def run(self):
        with open(self.output().path, 'w') as out:
            out.write('Your name is %s' % self.my_name)
While this second task definition is valid, it is not very useful… unless your name is also Mattia!
Let’s try and run the same task again with:
luigi --module tasks TellMeMyName --my-name Mattia
Because the first run was successful and the my_name.txt file is now available, Luigi informs us that he did not run any tasks this time:
Scheduled 1 tasks of which:
* 1 present dependencies were encountered:
    - 1 TellMeMyName(my_name=Mattia)

Did not run any tasks
This progress looks :) because there were no failed tasks or missing external dependencies
We are now ready to add a second task and build our first non-trivial pipeline!
Soldering the pipes
Our second task is:
class TellMeMyCity(luigi.Task):
    """
    A second very simple task that writes your name and the city where you live.
    """
    my_name = luigi.Parameter()
    my_city = luigi.Parameter()

    def requires(self):
        return TellMeMyName(my_name=self.my_name)

    def output(self):
        return luigi.LocalTarget(
            os.path.join(output_path, 'my_name_and_city.txt')
        )

    def run(self):
        with open(self.input().path) as name:
            text = name.read().strip()

        text += '\nYour city is %s' % self.my_city

        with open(self.output().path, 'w') as out:
            out.write(text)
As you can guess by inspecting its definition, TellMeMyCity tells us about both our name and our city through the my_name and my_city parameters.
Once again, before examining the full details, let’s execute the task with:
luigi --module tasks TellMeMyCity --my-name Mattia --my-city NYC
The new execution summary is:
Scheduled 2 tasks of which:
* 1 present dependencies were encountered:
    - 1 TellMeMyName(my_name=Mattia)
* 1 ran successfully:
    - 1 TellMeMyCity(my_name=Mattia, my_city=NYC)

This progress looks :) because there were no failed tasks or missing external dependencies
From the summary, we see that Luigi correctly detected that our new task has a dependency (TellMeMyName) whose output is already available from our previous run.
Thus, Luigi only executed the new task TellMeMyCity.
The output of TellMeMyCity is the my_name_and_city.txt text file, whose contents are:
Your name is Mattia
Your city is NYC
Yay! We are now officially data scientists and virtual plumbers!

The gory details
Let’s now break down the exact details of what happened when we executed our pipeline:
-
Luigi calls the
output()method ofTellMeMyCityand determines that, since the output filemy_name_and_city.txtdoes not exist,TellMeMyCityis not complete. -
From the
requires()method ofTellMeMyCity, Luigi infers that the task can be executed only once its dependency (TellMeMyName) is satisfied. -
Luigi goes to
TellMeMyNameand looks at the return value of itsoutput()method. -
Since the output file
my_name.txtalready exists (from our previous execution), Luigi marks the taskTellMeMyNameas complete. Ifmy_name.txtdid not exist, this would be the time when Luigi would call therun()method ofTellMeMyNameto create it. -
Luigi determines that everything is now ready to run
TellMeMyCityand proceeds to callingTellMeMyCity’srun()method (inrun(), themy_name.txtfile is read and the name of the city is added). -
The output of
TellMeMyCityis successfully produced. Since there are no other tasks waiting to be executed, Luigi stops. Our pipeline run is complete.
Let’s also take a moment to make a clear list with the main ingredients of a Luigi task.
Both our tasks inherit from the base luigi.Task class, at the core of which are three methods:
-
requires: we use this method to tell Luigi that a task (e.g.TellMeMyCity) should be executed only once its parent tasks (TellMeMyName, in our example) have been successfully executed, together with any other tasks that they depend on. -
output: we use theoutput()method to specify the output of a task. For example, inTellMeMyName, we are telling Luigi to expect a text file namedmy_name.txtas the output. Before attempting to runTellMeMyName, Luigi checks whethermy_name.txtexists: if it does not exists,TellMeMyNameis marked as incomplete and it will be executed; otherwise,TellMeMyNameis marked as complete, and Luigi will move on to executing any subsequent tasks that depend on it (in our case,TellMeMyCity). -
run: therun()method is where we implement the logic of a task. In the case ofTellMeMyCity, we declared in theoutput()method that the task will be complete once the filemy_name_and_city.txtexists. Therefore, we should make sure that our implementation of therun()method inside ofTellMeMyCityeventually createsmy_name_and_city.txt.
Also, recall that any parameters which we want to be able to pass to a task from the command line need to be specified as luigi.Parameters inside of the task itself.
Some remarks:
-
While
LocalTargets (think “files”) are commonly used, they are but one of many types of outputs that Luigi supports. -
While in general it is a good idea to write tasks that output single targets, a task need not necessarily output a single target.
-
The return value of both
requires()andoutput()can be atomic, an iterable, or a dictionary.
Also, while we focused on a particular class of tasks (luigi.Tasks), there are other types of Luigi task classes that you can leverage (e.g. WrapperTask, ExternalTask, and more).
“You can depend on me” ♫
A truly lovely feature is how simple Luigi makes it to define dependencies between tasks. Take a look back at our tasks’ definitions:
class TellMeMyName(luigi.Task):
    """
    An incredibly simple task that writes your name to a text file.
    """
    my_name = luigi.Parameter()

    def output(self):
        return luigi.LocalTarget(
            os.path.join(output_path, 'my_name.txt')
        )

    def run(self):
        with open(self.output().path, 'w') as out:
            out.write('Your name is %s' % self.my_name)

class TellMeMyCity(luigi.Task):
    """
    A second very simple task that writes your name and the city where you live.
    """
    my_name = luigi.Parameter()
    my_city = luigi.Parameter()

    def requires(self):
        return TellMeMyName(my_name=self.my_name)

    def output(self):
        return luigi.LocalTarget(
            os.path.join(output_path, 'my_name_and_city.txt')
        )

    def run(self):
        with open(self.input().path) as name:
            text = name.read().strip()

        text += '\nYour city is %s' % self.my_city

        with open(self.output().path, 'w') as out:
            out.write(text)
Notice how we can reference the path of the output file my_name.txt in the run method of TellMeMyCity with self.input().path.
Similarly, we are able to conveniently use self.output().path to reference the path of the task’s output file in each of the two tasks.
Among other things, this allows you to completely forget about the name or the location of the output file of the parent task TellMeMyName when you want to define its child task TellMeMyCity.
If you decide to change the name or the location or the name of my_name.txt in the output() method of TellMeMyName in the future, you will not have to worry about the consequences on its child task TellMeMyCity.
In TellMeMyCity, self.input().path will automatically point to the new location or name of my_name.txt.

Before moving on to the next world, let’s see what happens when the pipeline breaks!
Delete both output files (my_city.txt and my_name_and_city.txt), so that we can do a fresh run.
Leaky pipes
“To create is divine, to destroy is sublime!” - Me
Let’s define the following broken task:
class BrokenTask(luigi.Task):
    """
    A broken version of `TellMeMyCity` (missing `requires`).
    """
    my_name = luigi.Parameter()
    my_city = luigi.Parameter()

    def output(self):
        return luigi.LocalTarget(
            os.path.join(output_path, 'my_name_and_city.txt')
        )

    def run(self):
        with open(self.input().path) as name:
            text = name.read().strip()

        text += '\nYour city is %s' % self.my_city

        with open(self.output().path, 'w') as out:
            out.write(text)
BrokenTask is very similar to TellMeMyCity, but it lacks the requires() method which is needed in order to make the file my_city.txt available in run().
When we try to run BrokenTask with
luigi --module tasks BrokenTask --my-name Mattia --my-city NYC
we get
Scheduled 1 tasks of which:
* 1 failed:
    - 1 BrokenTask(my_name=Mattia, my_city=NYC)

This progress looks :( because there were failed tasks
Let’s now break the first part of our original pipeline. Here is a (broken) version of it:
class BrokenTellMeMyName(luigi.Task):
    """
    A broken version of `TellMeMyName`.
    """
    my_name = luigi.Parameter()

    def run(self):
        with open(self.output().path, 'w') as out:
            out.write('Your name is %s' % self.my_name)

class TellMeMyCityAgain(luigi.Task):
    """
    Same as `TellMeMyCity`.
    """
    my_name = luigi.Parameter()
    my_city = luigi.Parameter()

    def requires(self):
        return BrokenTellMeMyName(my_name=self.my_name)

    def output(self):
        return luigi.LocalTarget(
            os.path.join(output_path, 'my_name_and_city.txt')
        )

    def run(self):
        with open(self.input().path) as name:
            text = name.read().strip()

        text += '\nYour city is %s' % self.my_city

        with open(self.output().path, 'w') as out:
            out.write(text)
When we try to run this pipeline with
luigi --module tasks TellMeMyCityAgain --my-name Mattia --my-city NYC
we get
Scheduled 2 tasks of which:
* 1 failed:
    - 1 BrokenTellMeMyName(my_name=Mattia)
* 1 were left pending, among these:
    * 1 had failed dependencies:
        - 1 TellMeMyCityAgain(my_name=Mattia, my_city=NYC)

This progress looks :( because there were failed tasks
If you point your web browser to http://localhost:8082/, you can get a visualization of our debacle from the Luigi task visualizer:

Can you find what’s wrong in BrokenTellMeMyName and fix it? :)
If you are successful, your new visualization will look like this:

Luigi with a Jupyter twist!
Jupyter notebooks are undoubtedly among the most popular tools that data scientists and researchers use to create reproducible research. Notebooks are also used as a resource to prototype and test code in the development phase of a project.
Very often, I find myself writing R and Python code in multiple Jupyter notebooks to test new ideas and solve specific problems.
When my notebooks start becoming a little cleaner and better organized, I would love to be able to chain them into a manageable pipeline.
At the bare minimum, this would save me the time that it takes to translate or convert the notebooks into scripts (by the way, check out the luigi.contrib.external_program module if you want to turn your scripts into Luigi tasks).
Also, converting notebooks to scripts implies losing some interactivity perks. Likely, it also implies that I will have two maintain two versions of the same code (the original notebook and its script counterpart).
Wouldn’t it be nice to be able to integrate Jupyter notebooks into Luigi pipelines and get the best of both worlds?
Unfortunately, it is usually a little harder to pass information from outside of a notebook to the notebook itself, or from a notebook to another notebook.
The self.input() and self.output() trick that we explored in our previous example is not easily replicable when you want to implement a run method that executes a Jupyter notebook.
Not only that, however.
In fact, it is hard to pass any parameter from outside of the notebook to the notebook itself.
To overcome this limitation, I decided to try and write a Luigi submodule with a new type of Luigi task: the JupyterNotebookTask.
Turning notebooks into Luigi tasks with the JupyterNotebookTask class
“That’s one small step for a plumber […static…], one giant leap for all data scientists!” - Mario
JupyterNotebookTask inherits from the standard luigi.Task class and, as the name suggests, allows you to execute a Jupyter notebook as a Luigi task.
Furthermore, it enables you to read into the notebook parameters such as the values returned by the tasks’ self.input() and self.output() methods, as well as an arbitrary number of additional user-defined parameters.
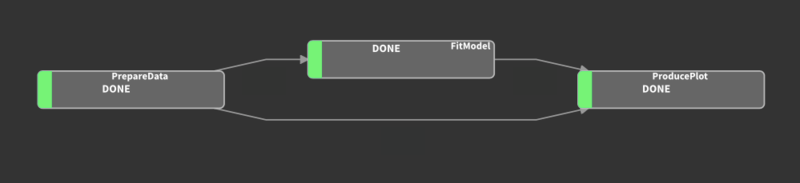
To demonstrate how JupyterNotebookTask works, we will build a small pipeline that combines three notebooks, respectively titled Prepare Data, Fit Model, and Produce Plot:
-
Prepare Data.ipynbproduces some synthetic classification data. In a real world application, this could be a notebook written by a teammate in which a certain dataset gets cleaned and organized in model-ready format. -
Fit Model.ipynbfits a Random Forest classifier to the available data. -
Produce Plot.ipynbsaves a plot with the Random Forest’s feature importances.
If you are following along, please take a moment now to configure a Python 3 Jupyter kernel which we will name luigi_tutorial_py3.
You can do this by executing:
python -m ipykernel install --user --name luigi_tutorial_py3
By the way, if you end up with a thousand Jupyter kernels like myself, you can always get a full list with
jupyter kernelspec list
and remove any unnecessary ones with rm -rf <useless-kernel-path>.
Our first task is the one needed to execute the Prepare Data.ipynb notebook:
from jupyter_notebook import JupyterNotebookTask

notebooks_path = '/Users/mattiaciollaro/Git/luigi_tutorial/notebooks/'

class PrepareData(JupyterNotebookTask):
    """
    A notebook that produces synthetic classification data.
    """
    notebook_path = os.path.join(notebooks_path, 'Prepare Data.ipynb')
    kernel_name = 'luigi_tutorial_py3'
    timeout = 60

    def output(self):
        return luigi.LocalTarget(os.path.join(
            output_path, 'model_ready_data.csv')
        )
PrepareData outputs a CSV file named model_ready_data.csv with the model-ready data that we use to train the RandomForest classifier.
This task has no dependencies, so the default requires() method of JupyterNotebookTask does not need to be altered.
As a side note, the default requires() and output() methods of JupyterNotebookTask coincide with the default methods of its base class, luigi.Task.
If not overridden, they simply return an empty list.
In a JupyterNotebookTask, you must assign a value to the following required parameters:
notebook_path: the full path to the Jupyter Notebook that you want to execute.kernel_name: the name of the kernel that you want to use to execute the notebook. In this case, we are using ourluigi_tutorial_py3kernel.
Optionally, you can also give a value to the timeout parameter.
For example, in PrepareData, we set this parameter to 60 seconds.
This means that if any cell in the Prepare Data.ipynb notebook takes more than 60 seconds to complete, the execution of the notebook will be interrupted and you will receive a timeout error.
In a JupyterNotebookTask, timeout defaults to -1, which means no timeout limit; i.e., a cell can take infinitely many seconds to execute and a timeout error will never be thrown, so be careful: if a JupyterNotebookTask ever seems to freeze, likely there is some cell in the notebook that is taking a very long time to be executed.
Note that in PrepareData we hard-coded notebook_path, kernel_name, and timeout instead of specifying them as luigi.Parameters.
This is OK as long as we do not plan to change the value of these parameters at run time from the command line.
Alternatively, we could define these three parameters as luigi.Parameters and simply add a default value, like this:
class PrepareData(JupyterNotebookTask):
    """
    A notebook that produces synthetic classification data.
    """
    notebook_path = luigi.Parameter(
        default=os.path.join(notebooks_path, 'Prepare Data.ipynb')
    )

    kernel_name = luigi.Parameter(
        default='luigi_tutorial_py3'
    )

    timeout = luigi.Parameter(
        default=60
    )

    def output(self):
        return luigi.LocalTarget(os.path.join(
            output_path, 'model_ready_data.csv')
        )
In this alternative definition, notebook_path, kernel_name, and timeout are not written in stone and their values can be changed at run time.
Also, beware that only parameters defined via the luigi.Parameter contructor are written to the JSON file.
Thus, the latter definition of PrepareData allows you to read notebook_path, kernel_name, and timeout in the notebook if you so desire; the former does not.
Let’s move on to defining a task for the next notebook, Fit Model.ipynb:
class FitModel(JupyterNotebookTask):
    """
    A notebook that fits a Random Forest classifier.
    """
    notebook_path = os.path.join(notebooks_path, 'Fit Model.ipynb')
    kernel_name = 'luigi_tutorial_py3'

    n_estimators = luigi.Parameter(
        default=200
    )

    criterion = luigi.Parameter(
        default='gini'
    )

    max_features = luigi.Parameter(
        default=50
    )

    def requires(self):
        return PrepareData()

    def output(self):
        return luigi.LocalTarget(os.path.join(
            output_path,
            'model_fit.pkl'
        ))
Note that the FitModel task depends on the PrepareData task.
In the output() method of FitModel, we make Luigi aware of the fact that the want the notebook to write the Random Forest model fit to a pickle file named model_fit.pkl
In FitModel, we added some parameters that are used in the notebook to control how we fit the Random Forest (these are some of the customizable parameters of sklearn.ensemble.RandomForestClassifier).
In particular, we want to fit a Random Forest with n_estimators trees in which the splits are obtained based on a certain criterion (e.g. Gini index or information gain/entropy). Furthermore, we want to limit to max_features the number of features that are randomly selected by the fitting procedure to determine the best split of the leaves in the trees.
Gotta catch ’em all!
But how do we catch all of these parameters inside of the notebook? It’s actually pretty simple!
-
When a
JupyterNotebookTaskis initialized, it reads all of itsluigi.Parameters and writes them to a temporary JSON file in the same location where the notebook is saved. -
The path to the temporary JSON file is exposed via the environment variable
PARS. The name of this variable can be altered using the task’s optionalenvironment_variableLuigi parameter, but this is rarely a necessity. -
Inside of the notebook, we can read the values of the task’s parameters by opening the temporary JSON file. The path to this file is accessible via
os.environ['PARS']while the task is being executed. Thus, the contents of ourFit Model.ipynbnotebook will look more or less like this:import os import json import pickle import pandas as pd from sklearn.ensemble import RandomForestClassifier # Read parameters with open(os.environ['PARS']) as parameters: pars = json.load(parameters) input_path = pars.get('input') output_path = pars.get('output') n_estimators = int(pars.get('n_estimators')) criterion = pars.get('criterion') max_features = int(pars.get('max_features')) # Read data model_data = pd.read_csv(input_path) # Fit classifer random_forest = RandomForestClassifier( n_estimators=n_estimators, criterion=criterion, max_features=max_features ) random_forest_fit = random_forest.fit( model_data.drop('response', axis=1), model_data['response'] ) # Save fit to the output pickle file with open(output_path, 'wb') as out: pickle.dump(random_forest_fit, out) -
Once the
runmethod of aJupyterNotebookTasktask is exited (successfully or not), the temporary JSON file is automatically deleted. If you wish to keep the temporary JSON file (sometimes this is useful for debugging), it is enough to setjson_action = 'keep'in the task definition. However, by default, the optional parameterjson_actionis set to'delete'.
We are now ready to write our final task for the Produce Plot.ipynb notebook:
class ProducePlot(JupyterNotebookTask):
    """
    A notebook that produces a visualization about the Random Forest
    classifier fit.
    """
    notebook_path = luigi.Parameter(
        default=os.path.join(notebooks_path, 'Produce Plot.ipynb')
    )

    kernel_name = luigi.Parameter(
        default='luigi_tutorial_py3'
    )

    n_estimators = luigi.Parameter(
        default=200
    )

    criterion = luigi.Parameter(
        default='gini'
    )

    max_features = luigi.Parameter(
        default=50
    )

    def requires(self):
        return {
            'data': PrepareData(),
            'model': FitModel(
                n_estimators=self.n_estimators,
                criterion=self.criterion,
                max_features=self.max_features
            )
        }

    def output(self):
        return luigi.LocalTarget(os.path.join(
            output_path,
            'importances_plot.png'
        ))
Finally, we can trigger the pipeline with:
luigi --module tasks ProducePlot --n-estimators 50 --criterion entropy --max-features 3
Note that the above command runs the Random Forest model with 50 trees using information gain/entropy as the splitting criterion, and limits to 3 the number of randomly sampled features that are used to determine the splits.
And there you have it:
Now, take a moment to explore the contents of your output directory.
If everything worked as expected, your output directory should contain the following items:
output
├── importances_plot.png
├── model_fit.pkl
├── model_ready_data.csv
├── my_name.txt
└── my_name_and_city.txt
and you can take a look at your feature importances plot. Mine looks like this:
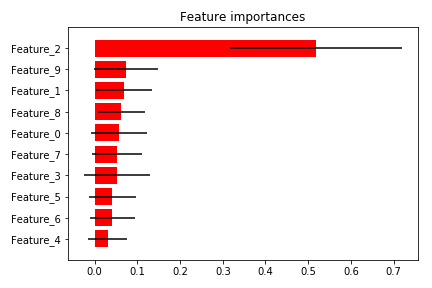
By the way, the Python code used to generate this plot inside of Produce Plot.ipynb is shamelessly copied from here!
On an Xmas tangent…!
If you enjoy Xmas as much as I do, you are probably starting to feel jolly and festive around this time of the year! Here are two final holiday tips before concluding this post.
1) Adding decorations to your Luigi pipelines
You may have noticed that our last task ProducePlot accumulates all of its predecessor’s parameters.
Luigi offers a couple of handy decorators to avoid redefining “inherited” parameters in latter tasks as your pipeline grows.
One of these is the @inherits decorator (available in the luigi.util).
With @inherits, we can define ProducePlot more succintly as:
@inherits(FitModel)
class ProducePlot(JupyterNotebookTask)

    notebook_path = luigi.Parameter(
        default=os.path.join(notebooks_path, 'Produce Plot.ipynb')
    )

    kernel_name = luigi.Parameter(
        default='luigi_tutorial_py3'
    )

    def requires(self):
        return {
            'data': PrepareData(),
            'model': FitModel(
                n_estimators=self.n_estimators,
                criterion=self.criterion,
                max_features=self.max_features
            )
        }

    def output(self):
        return luigi.LocalTarget(os.path.join(
            output_path,
            'importances_plot.png'
        ))
In this alternative version, n_features, criterion, and max_features are not explicitly defined because they are already “inherited” from the FitModel task.
@inherits makes things definitely more compact.
However, beware that compactness comes at the cost of harder-to-read and less self-contained task definitions.
While I have used the @inherits decorator in more than one occasion, I seldom use its cousin @requires.
Contrary to @inherits, which carries over only task parameters, @requires transfers both the task parameters and the requires() method of the inherited task to the inheriting task.
When you are dealing with complex pipelines with many parameters, you can also create one or more configuration files or write configuration tasks using the luigi.task.Config class.
2) A special advent calendar
If you are in the mood for a geeky Xmas, check out the Advent of Code!
Conclusions
Luigi is a really fun and efficient tool when it comes to creating data science pipelines.
In this post, we discussed the basics behind creating data science pipelines with Luigi.
Furthermore, we showed how to turn Jupyter notebooks into Luigi tasks by means of the
JupyterNotebookTask class.
Note that while we used Python 3 notebooks to demonstrate how to use JupyterNotebookTask, nothing prevents us from running notebooks written in different languages!
For example, in an R notebook os.environ['PARS'] becomes Sys.getenv('PARS'), and you would use the jsonlite R library to read the temporary JSON file.
The jupyter_notebook module containing the JupyterNotebookTask class also includes the load_parameters utility to simplify the process of reading the contents of the temporary JSON file into a Python notebook.
In particular, in a Python notebook, the block
from jupyter_notebook import load_parameters

pars = load_parameters()
and the block
import os
import json

with open(os.environ['PARS']) as parameters:
   pars = json.load(parameters)
yield exactly the same result, but the former is more handy and less verbose than the latter.
The JupyterNotebookTask class should shortly become part of the contrib package of the official distribution of Luigi.
However, you can start using it now from this post’s companion repository!
Well, this has really been a lot of fun!
If you find a bug, or have comments or questions regarding the JupyterNotebookTask class or this post,
I would love to hear from you! You can find me here.
Special thanks to Bob Minnich for the useful conversations about the development of JupyterNotebookTask!
The project started from our collaboration on some use cases at Spreemo Health.
And a very big thank you to Intoli’s founders, Andre and Evan, for hosting this post!
Suggested Articles
If you enjoyed this article, then you might also enjoy these related ones.

How F5Bot Slurps All of Reddit
The creator of F5Bot explains in detail how it works, and how it's able to scrape million of Reddit comments per day.

Recreating Python's Slice Syntax in JavaScript Using ES6 Proxies
A gentle introduction to JavaScript proxies where we use them to recreate Python's extended slice syntax.

Comments