By Evan Sangaline | August 9, 2017
Detecting Headles Chrome
A short article titled Detecting Chrome Headless popped up on Hacker News over the weekend and it has since been making the rounds. Most of the discussion on Hacker News was focused around the author’s somewhat dubious assertion that web scraping is a “malicious task” that belongs in the same category as advertising fraud and hacking websites. That’s always a fun debate to get into, but the thing that I really took issue with about the article was that it implicitly promoted the idea of blocking users based on browser fingerprinting. As far as I’m concerned, this is generally a terrible idea and you’re far more likely to block and frustrate your users than to provide any sort of meaningful deterrent to those who you are trying to block.
To illustrate this point, I implemented all of the tests proposed in Detecting Chrome Headless and, unsurprisingly, my standard everyday browser failed some of the tests.
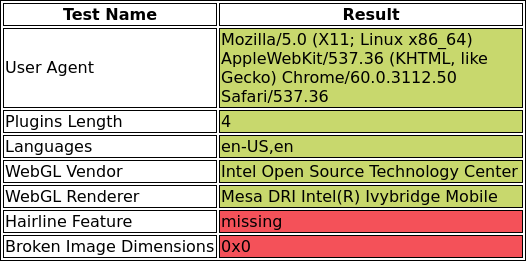
I sent the same test to a handful of friends on different platforms and every single one failed at least one of these. None of us would be able to visit a website that naïvely implemented the proposed set of tests and blocked content based on them. Check for yourself and see if you would be blocked as well.
If you just check a couple of browser configurations and then block content based on that then there’s no question that you are going to be blocking people unintentionally.
As an example, one of the proposed tests–the one that the author called his “most robust”–was that the dimensions of a broken image not be equal to 0x0.
This test might have worked in Chrome 59, but it no longer does in Chrome 60.
To make something that is legitimately robust, you would realistically need to support a different set of tests for Chrome, Safari, Firefox, Chromium, Opera, Brave, etc. and you would also need the tests to be version specific and constantly updated.
To implement filtering like this in a remotely responsible way would require really knowing what you’re doing and it would involve an immense amount of effort. And for what? It’s not like any of these tests aren’t trivial to get around anyway. You might successfully block Joe Schmoe who disabled the Chromium PDF Plugin due to security concerns, but anybody seriously interested in advertising fraud, blackhat hacking, or–god forbid–web scraping isn’t going to have any difficulty getting around any test that you can come up with. It’s like DRM; the best you can hope for is to universally give your users a worse experience so that you can mildly inconvenience the people who will get around any deterrents anyway.
To help emphasize that these sort of tests aren’t actually effective in practice, I decided to go through and show how each one of them can be bypassed. It only took a few hundred lines of code to make Chrome Headless do better on the tests than standard Chrome! These won’t of course make Chrome Headless universally undetectable, but any more sophisticated tests can easily be bypassed in similar ways. Hopefully, you’ll find the techniques proposed here interesting whether you’re doing some web scraping of your own or just curious to see how it’s done.
User Agent
This is pretty much the only one of the proposed tests that can legitimately identify Chrome Headless, but it’s also the most trivial to bypass. The default user agent when running Chrome in headless mode will be something like
Mozilla/5.0 (X11; Linux x86_64) AppleWebKit/537.36 (KHTML, like Gecko) HeadlessChrome/60.0.3112.50 Safari/537.36
where the key part that gives it away is HeadlessChrome.
To change this, we can simply provide Chrome with the --user-agent command-line option.
If you’re running Chrome directly from the command-line then you just need to include this option in addition to the --headless one.
/opt/chrome/chrome-beta/chrome --headless \
    --user-agent="Mozilla/5.0 (X11; Linux x86_64) AppleWebKit/537.36 (KHTML, like Gecko) Chrome/60.0.3112.50 Safari/537.36"
The same options can be similarly specified using ChromeOptions.add_argument() if you’re using Python, Selenium, and ChromeDriver.
from selenium import webdriver

user_agent = 'Mozilla/5.0 (X11; Linux x86_64) AppleWebKit/537.36 (KHTML, like Gecko) Chrome/60.0.3112.50 Safari/537.36'

options = webdriver.ChromeOptions()
# specify headless mode
options.add_argument('headless')
# specify the desired user agent
options.add_argument(f'user-agent={user_agent}')
driver = webdriver.Chrome(chrome_options=options)

# user-agent is now set
The approach is slightly different if you want to use the Chrome DevTools Protocol, but it’s similarly trivial to accomplish.
const CDP = require('chrome-remote-interface');

const userAgent = 'Mozilla/5.0 (X11; Linux x86_64) AppleWebKit/537.36 (KHTML, like Gecko) Chrome/60.0.3112.50 Safari/537.36'

CDP(async function(client) {
  const {Network, Page} = client;
  await Page.enable();
  await Network.enable();
  await Network.setUserAgentOverride({userAgent});

  // user-agent is now set
});
All of these methods will change the user agent in both the HTTP headers and window.navigator.userAgent.
Now on to the more challenging ones!
Languages and Plugins
Two of the proposed tests were to check for navigator.plugins.length === 0 and navigator.languages == ''.
These can both be bypassed by injecting JavaScript into each page that overwrites window.navigator with the desired values.
Let’s just focus on the JavaScript to mock these values for now.
We’ll circle back and look at how to inject it once we’ve gone through all of the tests because all of them will need to be injected at once.
We basically just want to overwrite the plugins and languages properties on navigator with values that will pass our tests.
Your first thought might be to just set the properties directly
navigator.languages = ['en-US', 'en'];
navigator.plugins = [1, 2, 3, 4, 5];
but this wouldn’t actually overwrite the values because these are ready-only properties with getter functions as accessors.
We need to instead use Object.defineProperty() to redefine the properties with new getter functions.
This can be done as follows.
// overwrite the `languages` property to use a custom getter
Object.defineProperty(navigator, 'languages', {
  get: function() {
    return ['en-US', 'en'];
  },
});

// overwrite the `plugins` property to use a custom getter
Object.defineProperty(navigator, 'plugins', {
  get: function() {
    // this just needs to have `length > 0`, but we could mock the plugins too
    return [1, 2, 3, 4, 5];
  },
});
After executing this JavaScript on a page, navigator.languages will report ['en-US', 'en'] and navigator.plugins will have a length of 5.
The plugins could be mocked in more depth, but this isn’t necessary in this case because the test that we’re bypassing only checks the length of the array.
WebGL Vendor and Renderer
The next test creates a WebGL context and then checks the vendor and renderer strings.
A vendor string of Brian Paul or a renderer of Mesa OffScreen are supposed to indicate Chrome Headless.
I wasn’t able to reproduce these strings on my machine, but let’s look at how we can mock these values anyway in case they were present.
We’ll simply hardcode WebGLRenderingContext.getParameter() to return our desired vendor and renderer strings by modifying the prototype for WebGLRenderingContext.
Modifying the prototype ensures that our patched version will be called on any instances of WegGlRenderingContext that are created (e.g. by executing canvas.getContext('webgl')).
const getParameter = WebGLRenderingContext.getParameter;
WebGLRenderingContext.prototype.getParameter = function(parameter) {
  // UNMASKED_VENDOR_WEBGL
  if (parameter === 37445) {
    return 'Intel Open Source Technology Center';
  }
  // UNMASKED_RENDERER_WEBGL
  if (parameter === 37446) {
    return 'Mesa DRI Intel(R) Ivybridge Mobile ';
  }

  return getParameter(parameter);
};
This patched version of getParameter() returns the desired values for the renderer and vendor while deferring to the standard implementation for any other parameter values.
The integers here are standard constants which uniquely identify the parameters.
Broken Image
We’ve already mentioned that the broken image test doesn’t really make sense because Chrome 60 reports an image size of 0x0 for broken images.
Let’s take a look at how we could do this anyway, just to show that it’s also easy to bypass.
This approach combines a couple of the techniques that we’ve used already.
We’ll again modify the prototype, this time of HTMLImageElement, so that the changes we make will apply to any images that are created in the DOM.
Both width and height are properties with accessors so we’ll also need to use Object.defineProperty() to overwrite their getter methods.
We’ll return widths and heights of 20 for broken images and otherwise simply defer to the standard getter implementation.
['height', 'width'].forEach(property => {
  // store the existing descriptor
  const imageDescriptor = Object.getOwnPropertyDescriptor(HTMLImageElement.prototype, property);

  // redefine the property with a patched descriptor
  Object.defineProperty(HTMLImageElement.prototype, property, {
    ...imageDescriptor,
    get: function() {
      // return an arbitrary non-zero dimension if the image failed to load
      if (this.complete && this.naturalHeight == 0) {
        return 20;
      }
      // otherwise, return the actual dimension
      return imageDescriptor.get.apply(this);
    },
  });
});
This is slightly more complicated than some of the earlier ones, but it’s still fairly straightforward.
Retina/HiDPI Hairline Feature
The last method proposed was to detect support for retina hairlines using the Modernizr library. This is another test that doesn’t really make a ton of sense because the majority of people don’t have HiDPI screens and most users’ browsers won’t support this feature. It would, however, be trivial to bypass even if it did make sense to use as a test.
We can see from the Modernizr source, that the test basically amounts to inserting a div tag with an id of modernizr into the page along with the following stylesheet.
#modernizr {
  border: .5px solid transparent;
}
The offsetHeight property of the div is then checked and if it has a value of 1 then the hairline feature is supported.
All we need to do here is to modify the prototype of HTMLDivElement such that offsetHeight returns 1 if the id is modernizr.
This basic pattern should be getting pretty familiar now…
// store the existing descriptor
const elementDescriptor = Object.getOwnPropertyDescriptor(HTMLElement.prototype, 'offsetHeight');

// redefine the property with a patched descriptor
Object.defineProperty(HTMLDivElement.prototype, 'offsetHeight', {
  ...elementDescriptor,
  get: function() {
    if (this.id === 'modernizr') {
        return 1;
    }
    return elementDescriptor.get.apply(this);
  },
});
Facing unique challenges with Web Scraping?
We will work with you to build custom solutions to fit your needs. From web scraping to machine learning, our experts are here to help.
Get started nowPutting It All Together
At this point, we have a bunch of JavaScript snippets that will bypass the Chrome Headless tests.
We simply need for Chrome to execute them before the test code on the target website.
It’s possible to inject JavaScript into a page with Selenium using a call to WebDriver.executeScript(), but this can unfortunately only be called after the document’s onload event has fired.
This means that if there’s a synchronous test blocking the page load that it will run before the injected JavaScript has a chance to mock the various things that the tests are checking for.
If we want to pass the tests reliably then we’ll need to find a way to ensure that our code runs before the test code on the page.
My favorite way to do this is to write a small Chrome Extension that injects a script tag into the head of any visited pages.
Unfortunately, Chrome Headless doesn’t support extensions yet and likely won’t for the foreseeable future.
Until that functionality is added, we’ll need to use alternative methods.
A more robust way to inject JavaScript into a page is to actually modify the requested HTML in-flight and inject the script tag before the browser ever has the chance to see the original.
This is a technique that is more commonly used to serve patched versions of a site’s own scripts, but it can be applied in the same manner to this usecase.
We’ll use mitmproxy, a TLS-capabable HTTP proxy that’s very easy to script, to inject our code.
First, we’ll need to install both mitmproxy and BeautifulSoup4.
These are probably both available via your system’s package manager, but you can also install them within a virtualenv using pip install mitmproxy bs4 if so desired.
We’ll now make a short python script called inject.py with the following contents.
from bs4 import BeautifulSoup
from mitmproxy import ctx

# load in the javascript to inject
with open('content.js', 'r') as f:
    content_js = f.read()

def response(flow):
    # only process 200 responses of html content
    if flow.response.headers['Content-Type'] != 'text/html':
        return
    if not flow.response.status_code == 200:
        return

    # inject the script tag
    html = BeautifulSoup(flow.response.text, 'lxml')
    container = html.head or html.body
    if container:
        script = html.new_tag('script', type='text/javascript')
        script.string = content_js
        container.insert(0, script)
        flow.response.text = str(html)

        ctx.log.info('Successfully injected the content.js script.')
The inject.py script defines a response(flow) function which will be called by mitmproxy before each response is proxied.
If the response has a 200 status codes and a content type of text/html, then we inject our script tag with content that is loaded from content.js.
The content.js here simply contains all of the JavaScript test bypasses that we developed in each of the preceding sections.
To start our proxy with this script, we can now run the following.
mitmdump -p 8080 -s "inject.py"
We also have to tell Chrome to use our proxy by specifying the --proxy-server option.
/opt/google/chrome-beta/chrome \
    --headless \
    --proxy-server=localhost:8080 \
    --remote-debugging-port=9222
The --headless option predictably tells Chrome to run in headless mode and --remote-debugging-port specifies the debugging interface that we will use to communicate with and control the instance.
You can run the command now and it will just sit and wait for us to connect to the debugging port in a few minutes.
We’ll use Chrome Remote Interface to actually control the instance.
This interface is somewhat similiar to Selenium, but it’s specific to Chrome and allows for more fine-grained control of certain things.
In particular, it allows us to accept the self-signed certificates from mitmproxy.
This should be possible with ChromeDriver because acceptInsecureCerts is specified as part of the W3 spec, but this particular feature hasn’t yet been implemented in Chrome Headless.
To install Chrome Remote Interface, you can run yarn add chrome-remote-interface or the equivalent with your package manager of choice.
Once it’s installed, then create a file called test-headless.js with the following contents.
const CDP = require('chrome-remote-interface');
const fs = require('fs');

// global settings
const filename = 'headless-results.png';
const url = 'https://intoli.com/blog/making-chrome-headless-undetectable/chrome-headless-test.html';
const userAgent = 'Mozilla/5.0 (X11; Linux x86_64) AppleWebKit/537.36 (KHTML, like Gecko) Chrome/60.0.3112.50 Safari/537.36'

CDP(async function(client) {
  const {Network, Page, Security} = client;
  await Page.enable();
  await Network.enable();
  await Network.setUserAgentOverride({userAgent});

  // ignore all certificate errors to support mitmproxy certificates
  await Security.enable();
  await Security.setOverrideCertificateErrors({override: true});
  Security.certificateError(({eventId}) => {
    Security.handleCertificateError({
        eventId,
        action: 'continue'
    });
  });

  // navigate to the page and wait for it to load
  await Page.navigate({url});
  await Page.loadEventFired();

  setTimeout(async function() {
    // save the screenshot
    const screenshot = await Page.captureScreenshot({format: 'png'});
    const buffer = new Buffer(screenshot.data, 'base64');
    fs.writeFile(filename, buffer, 'base64', function(err) {
      if (err) {
        console.error(`Error saving screenshot: ${err}`);
      } else {
        console.log(`"${filename}" written successfully.`);
      }
      client.close();
    });
  }, 1000); // 1 second delay for the tests to complete
}).on('error', err => {
  console.error(`Error connecting to Chrome: ${err}`);
});
This script will connect to our currently running Headless Chrome instance, visit the test page, save a screenshot after 1 second, and then quit.
Chrome itself is already running and has already been configured to proxy everything through mitmproxy.
The page that Chrome renders should therefore include our bypass code in the head tag of the document.
All of the pieces are now in place and we can now run the script with node test-headless.js (note that this will require a node version of at least 7.6 due to the usage of async/await).
When the script runs, we should see output similar to the following in the mitmdump terminal.
Loading script: inject.py
Proxy server listening at http://0.0.0.0:8080
127.0.0.1:57132: clientdisconnect
127.0.0.1:59524: clientconnect
127.0.0.1:59524: CONNECT intoli.com:443
 << Cannot establish TLS with client (sni: intoli.com): TlsException("(104, 'ECONNRESET')",)
127.0.0.1:59526: clientconnect
127.0.0.1:59524: clientdisconnect
Successfully injected the content.js script.
127.0.0.1:59526: GET https://intoli.com/blog/making-chrome-headless-undetectable/chrome-headless-test.html
              << 200 OK 1.12k
127.0.0.1:59528: clientconnect
127.0.0.1:59526: GET https://intoli.com/blog/making-chrome-headless-undetectable/modernizr.js
              << 200 OK 2.43k
127.0.0.1:59528: CONNECT intoli.com:443
 << Cannot establish TLS with client (sni: intoli.com): TlsException("(-1, 'Unexpected EOF')",)
127.0.0.1:59530: clientconnect
127.0.0.1:59528: clientdisconnect
127.0.0.1:59526: GET https://intoli.com/blog/making-chrome-headless-undetectable/chrome-headless-test.js
              << 200 OK 2.27k
127.0.0.1:59526: GET https://intoli.com/nonexistent-image.png
              << 404 Not Found 189b
There are also a number of errors, but these aren’t anything to worry about because they are the result of the client needing to override the certificate errors.
Ignoring those, it looks like we saw the expected requests and that the script tag was successfully injected before returning the chrome-headless-test.html response.
Finally, let’s take a look at the generated headless-results.png to verify that we now pass all of the tests.
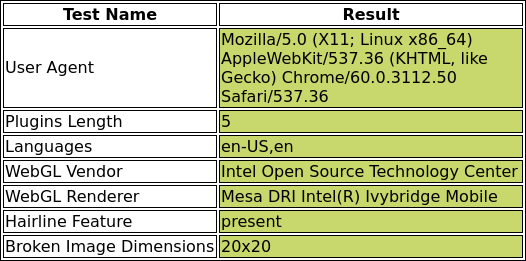
We passed with flying colors!
Wrap Up
This is admittedly a bit of a convoluted method to bypass the tests. It would generally be easier to simply patch a site’s detection scripts to always pass and then serve the patched versions via mitmproxy. The reason that I took this longer route is that I wanted to really emphasize that the tests themselves aren’t checking anything that can’t be easily spoofed.
There’s simply no way to differentiate a well-behaved bot from a human user. And why should you need to? If a bot is visiting a website on behalf of a user, and browses at the same rates as a user, then what’s the difference really? I can completely understand blocking users based on abusive access, but it’s tilting at windmills to try to restrict any form of automated access. You’ll just end up blocking innocent users and the smart bots will go undetected.
If you’re trying to scrape a website that’s a bit overzealous with it’s blocking mechanisms then please do feel free to get in touch. Intoli’s team members are experts in writing well-behaved bots that are indistinguishable from human users. We can additionally help you put custom data validation and analysis workflows in place that help you extract value from your data.
Suggested Articles
If you enjoyed this article, then you might also enjoy these related ones.

Performing Efficient Broad Crawls with the AOPIC Algorithm
Learn how to estimate page importance and allocate bandwidth during a broad crawl.
Breaking Out of the Chrome/WebExtension Sandbox
A short guide to breaking out of the WebExtension content script sandbox.

User-Agents — Generating random user agents using Google Analytics and CircleCI
A free dataset and JavaScript library for generating random user agents that are always current.
Comments