By Evan Sangaline | November 20, 2017
Running Google Chrome with an extension installed is quite simple because Chrome supports a --load-extension command-line argument for exactly this purpose.
This can be specified before launching Chrome with Selenium by creating a ChromeOptions instance and calling add_argument().
from selenium import webdriver
from selenium.common.exceptions import NoSuchElementException


# Configure the necessary command-line option.
options = webdriver.ChromeOptions()
options.add_argument('--load-extension=path/to/the/extension')

# Initalize the driver with the appropriate options.
driver = webdriver.Chrome(chrome_options=options)
The above code will setup a Selenium driver for Chrome with the extension located at path/to/extension preinstalled.
Let’s make a very minimal Chrome extension and use it to verify that this code works. We’ll first need to make a directory to hold the extension
mkdir chrome-extension
and then we’ll need to create a manifest.json file inside of that directory to define the basic meta-information for the extension.
Here’s a very basic example of a manifest.json file
{
  "manifest_version": 2,
  "name": "Chrome Extensions With Selenium",
  "version": "1.0.0",
  "content_scripts": [
    {
      "matches": ["*://*/*"],
      "js": ["content.js"],
      "run_at": "document_start"
    }
  ]
}
which includes only the minimum required fields and one content script.
The content script is expected to be located in chrome-extension/content.js and it will be automatically injected into every page when the extension is installed.
You can put whatever you want in here for web scraping or browser automation purposes, but here’s a useful piece of code for testing that Chrome is successfully loading the extension before launching.
// Wait for the DOM to completely load.
document.addEventListener("DOMContentLoaded", () => {
// Overwrite the contents of the body.
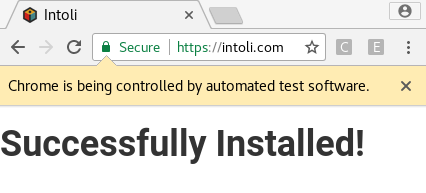
document.body.innerHTML = '<h1 id="installed" >Successfully Installed!</h1>';
});
This code will first wait for the DOM to load completely and will then replace the entire body of the document with a big banner saying “Successfully Installed!”
We can write a simple test script for this that checks for the injected h1 tag and prints out a success or failure message.
from selenium import webdriver
from selenium.common.exceptions import NoSuchElementException


# Configure the necessary command-line option.
options = webdriver.ChromeOptions()
# Note that `chrome-extension` is the path to the unpackaged extension.
options.add_argument('--load-extension=chrome-extension')

# Navigate to any page... well, not just *any* page...
driver = webdriver.Chrome(chrome_options=options)
driver.get('https://intoli.com')

# Check if the extension worked and log the result.
try:
    header = driver.find_element_by_id('successfully-installed')
    print('Success! :-)')
except NoSuchElementException:
    print('Failure! :-(')
finally:
    # Clean up.
    driver.quit()
Running the script should output
Success! :-)
provided that everything is working correctly. The browser will quit automatically during the test, but you’ll like also see our success message flash briefly on the screen before that happens.
Note that if you attempt to run this test in headless mode by adding an options.add_argument('--headless') line, you will unfortunately see the failure message.
Failure! :-(
This is because Google Chrome currently does not support Extensions in headless mode. If you have a use case for Chrome in headless mode then be sure to let the Chrome team know! It’s something that many of us would really love to see, and it will only happen if they get significant feedback about the issue.
Suggested Articles
If you enjoyed this article, then you might also enjoy these related ones.
Breaking Out of the Chrome/WebExtension Sandbox
A short guide to breaking out of the WebExtension content script sandbox.

Recreating Python's Slice Syntax in JavaScript Using ES6 Proxies
A gentle introduction to JavaScript proxies where we use them to recreate Python's extended slice syntax.
Building a YouTube MP3 Downloader with Exodus, FFmpeg, and AWS Lambda
A short guide to building a practical YouTube MP3 downloader bookmarklet using Amazon Lambda.
Comments