By Evan Sangaline | February 20, 2018
There’s a lot to love about CircleCI. First of all, continuous integration is just awesome in general. You can certainly develop fine software without it, but a good CI configuration can really make your life easier. Beyond that, CircleCI has a generous free tier, provides four free containers per open source project, allows the use of custom Docker images, and is reasonably easy to configure.
There’s unfortunately also some stuff not to love about CircleCI. The big one is that their support forums often feel like a way for their users to ask each other why CircleCI isn’t responding or fixing any bugs in the platform. I know that sounds pretty harsh… but there’s some truth to it. Let’s take a look at a specific example.
CircleCI has a concept of “build artifacts,” which are files produced during a build that will then get automatically uploaded to S3. These typically might include compiled binaries, log files, test coverage results, etc. When you have an open source project, you might want to be able to link to the latest code coverage report, a download of the latest package, or the most recent version of any other byproduct of the build. Unfortunately, that’s not really possible with CircleCI.
Don’t get me wrong, I think it’s supposed to be possible. The API does have a mechanism for accessing the latest version of a build artifact according to the CircleCI documentation, However, accessing these API endpoints always produces 500 internal server errors. That’s admittedly from an older version of the documentation–so maybe they just removed this functionality and didn’t mention it anywhere–but that’s sort of a separate issue than their unresponsiveness on support issues.
Let’s take a look at some excerpts from the relevant thread on their discussion forum.
The reluctance to implement this is really baffling. It seems like it would be simple to implement, virtually no maintenance, and really useful for many people. – jimfarrand
Bump. I really want to link to latest nightly run artifacts from the projects readme. – brandonpage
…it gives me 500 every time. And has for the past ~6 months. – Tethik
It would be great if we could get some input from a CircleCI employee here. – Moose
A moderator did eventually chime in, but that was after nearly two years of users commenting on the thread and there’s still no solution.
So what’s is an enterprising young individual with a moderately successfuly open source project on GitHub supposed to do?
Well, it turns out that some of CircleCI’s artifact API does work.
You can get a listing of the filenames and URLs from the latest build, you just can’t directly access the latest version of an artifact with a single request (as would be required to link to a file, create a badge, etc.).
It should be possible to write a small API endpoint that fetches the full listing of the latest build artifacts from CircleCI’s API, finds the URL for the latest version of a specific artifact, and then returns a 303 redirect to that URL.
This endpoint could then by hosted on Amazon’s AWS Lambda where it could serve as a lightweight microservice for resolving the latest version of a CircleCI build artifact.
In this article, we’ll describe how to do exactly that.
We’ll first put together a simple node.js express app that can serve a redirect to the latest version of any specified build artifact. Then we’ll walk though the process of deploying it as a Lambda function on AWS and providing access to it using AWS API Gateway. You’ll be able to host this on your own AWS if you would like to, but Intoli is also providing the generated API free of charge to any open source project that would like to use it. You can simply link to
https://circleci.intoli.com/artifacts/github-username/repo-name/path/to/the/artifact
and it will serve up a 303 redirect to the latest version of the file from the last passing build on the master branch.
Also–as always–the code and run-instructions for this article are available in the intoli-article-materials repository. Be sure to star or watch the repository if you want to get notified about the latest content from Intoli! It’s a great way to keep up to date on our latest articles. For the traditionalists out there, you might prefer getting your news the old fashioned way.
The Intoli Monthly Newsletter
Enjoying this article? Sign up to get monthly updates on our best new content!
Writing the Express App
Before we even think about AWS Lambda, we’ll need to implement the API that we would eventually like to deploy.
We’ll use the CircleCI Build Artifacts endpoint to get a listing of the latest build artifacts for a project.
In the following command, intoli is the GitHub username, exodus is the name of the project on GitHub, and the query string paramaters indicate that we would like the artifacts from the last passing build on the master branch.
curl 'https://circleci.com/api/v1.1/project/github/intoli/exodus/latest/artifacts?branch=master&filter=successful'
When we run this, we’ll get back an array of artifacts which looks something like this (note that I removed most of the response for brevity).
[{
  "path" : "coverage-report/total-coverage.json",
  "pretty_path" : "coverage-report/total-coverage.json",
  "node_index" : 0,
  "url" : "https://85-119092220-gh.circle-artifacts.com/0/coverage-report/total-coverage.json"
}, {
  "// etc.": "// There are a bunch of other files that I removed from the response..."
}]
The logic that will be required for our microservice is relatively straightforward:
- Listen on
/artifacts/<username>/<project>/<path-to-file>forGETrequests. - Parse optional query string parameters for
branch,build,filter, andvcsType(with the defaults respectively set tomaster,latest,successful, andgithub). - Construct the corresponding URL for the CircleCI API endpoint to list all of the latest artifacts.
- Fetch the listing of artifacts from CircleCI’s API.
- Loop through all of the artifacts and return a
303redirect to the corresponding URL on S3 if the path matches. - Return a
404file-not-found error if no artifacts match the provided path.
An implementation for this might look something like this.
const https = require('https');

const express = require('express');
const app = express();


app.get('/artifacts/:username/:project/*', (req, res) => {
  // Mandatory positional arguments.
  const file = req.params[0];
  const { project, username } = req.params;

  // Optional query string parameters.
  const branch = req.query.branch || 'master';
  const build = req.query.build || 'latest';
  const filter = req.query.filter || 'successful';
  const vcsType = req.query.vcsType || 'github';

  // Construct the request options for hitting CircleCI's API.
  const requestOptions = {
    hostname: 'circleci.com',
    path: `/api/v1.1/project/${vcsType}/${username}/${project}` +
      `/${build}/artifacts?branch=${branch}&filter=${filter}`,
    port: 443,
    method: 'GET',
    headers: {
      'Accept': 'application/json',
    },
  };

  // Make the request.
  https.get(requestOptions, response => {
    // Accumulate the response body.
    let body = '';
    response.setEncoding('utf8');
    response.on('data', data => body += data);

    // Process the complete response.
    response.on('end', () => {
      try {
        // Loop through and try to find the specified artifact.
        const artifacts = JSON.parse(body);
        for (let i = 0; i < artifacts.length; i++) {
          const artifact = artifacts[i];
          if (artifact.path === file) {
            // Redirect to the artifact URL if we can find it.
            return res.redirect(303, artifact.url);
          }
        }
        // Return a 404 if there are no matching artifacts.
        return res.status(404).send('Not found.');
      } catch (e) {
        console.error(e);
        return res.status(500).send(`Something went wrong: ${e.message}`);
      }
    });
  });
});


// Run the app when the file is being run as a script.
if (!module.parent) {
  app.listen(3000, () => console.log('Listening on port 3000!'))
}

// Export the app for use with lambda.
module.exports = app;
After saving this in a file called app.js and installing express with yarn add express, you should be able to run the service on your own machine with node app.js.
The app will listen on port 3000 and we can test it be running the following.
# The `-L`/`--location` flag tells `curl` to follow redirects.
curl -L 'http://localhost/artifacts/intoli/exodus/coverage-report/total-coverage.json'
If everything is working correctly, then this should output something like the following.
{ "coverage": "92.01%" }
Now we just need to turn this into a Lambda function, deploy it, and expose it as an API!
Lambdify-ing the Express App
You might have noticed that app.js checked that !module.parent before calling app.listen().
This was done so that a local server could be run by executing node app.js, but the configured app object could also be imported from another file without the app listening automatically.
Lambda functions work by exposing a handler function that is invoked with event and context data.
Instead of making our app listen on a port, we’ll need to make it capable of processing the provided event and context objects.
AWS Labs has a project called aws-serverless-express which makes it very easy to adapt an express app to work as a Lambda function.
It can be installed by running yarn add aws-serverless-express, and then we simply need to make a file called lambda.js with the following contents.
const awsServerlessExpress = require('aws-serverless-express');
const app = require('./app');
const server = awsServerlessExpress.createServer(app);

exports.handler = (event, context) => (
  awsServerlessExpress.proxy(server, event, context)
);
This exports a handler function which will allow us to use our express app as a Lambda function.
Creating an AWS Role and Policy
Before we actually create the Lambda function, we’ll need to create a role that the Lambda function and the API Gateway will be able to assume.
To do this, create a new file called circleci-artifacts-role-policy-document.json with the following contents.
{
  "Version": "2012-10-17",
  "Statement": [
    {
      "Effect": "Allow",
      "Principal": {
        "Service": [
          "apigateway.amazonaws.com",
          "lambda.amazonaws.com"
        ]
      },
      "Action": "sts:AssumeRole"
    }
  ]
}
We can then create a role with create-role by running the following.
# Store the JSON response in a variable.
response="$(aws iam create-role \
    --role-name CircleciArtifactsRole \
    --assume-role-policy-document file://circleci-artifacts-role-policy-document.json)"

# Echo the response in the terminal.
echo "${response}"

# Store the role ARN for future usage.
role_arn="$(jq -r .Role.Arn <<< "${response}")"
Note that I’m storing the response in an environment variable here, and then using jq to extract a particular value from the JSON response (in this case, the role’s Amazon Resource Name/ARN).
This will allow us to use variable substitution for this value in later commands instead of having to add it manually as an argument.
The full response is also echoed to the terminal so that we can see the normal command output, but you don’t have to worry about extracting anything from this beyond what we grab with jq.
I’ll use this same pattern in all of the future commands as well.
The above code should echo the full JSON response, which will look something like this.
{
    "Role": {
        "Path": "/",
        "RoleName": "CircleciArtifactsRole",
        "RoleId": "AROAIRRT73P5E7IPJVAKM",
        "Arn": "arn:aws:iam::421311779261:role/CircleciArtifactsRole",
        "CreateDate": "2018-02-04T18:31:04.173Z",
        "AssumeRolePolicyDocument": {
            "Version": "2012-10-17",
            "Statement": [
                {
                    "Effect": "Allow",
                    "Principal": {
                        "Service": [
                            "apigateway.amazonaws.com",
                            "lambda.amazonaws.com"
                        ]
                    },
                    "Action": "sts:AssumeRole"
                }
            ]
        }
    }
}
Now we’ll need to attach a policy to this role which grants the necessary permissions.
First, create another JSON file called circleci-artifacts-policy.json with the following contents.
{
  "Version": "2012-10-17",
  "Statement": [
    {
      "Effect": "Allow",
      "Action": [
        "apigateway:*"
      ],
      "Resource": "arn:aws:apigateway:*::/*"
    },
    {
      "Effect": "Allow",
      "Action": [
        "execute-api:Invoke"
      ],
      "Resource": "arn:aws:execute-api:*:*:*"
    },
    {
      "Effect": "Allow",
      "Action": [
          "lambda:*"
      ],
      "Resource": "*"
    }
  ]
}
This policy is a little on the liberal side, but we can come back and restrict the resources after we know their specific ARNs. To attach the policy, we can use put-role-policy.
aws iam put-role-policy \
    --role-name CircleciArtifactsRole \
    --policy-name CircleciArtifactsPolicy \
    --policy-document file://circleci-artifacts-policy.json
This command won’t output anything, but it will grant our IAM role the permissions necessary for the Lambda function and API Gateway to function.
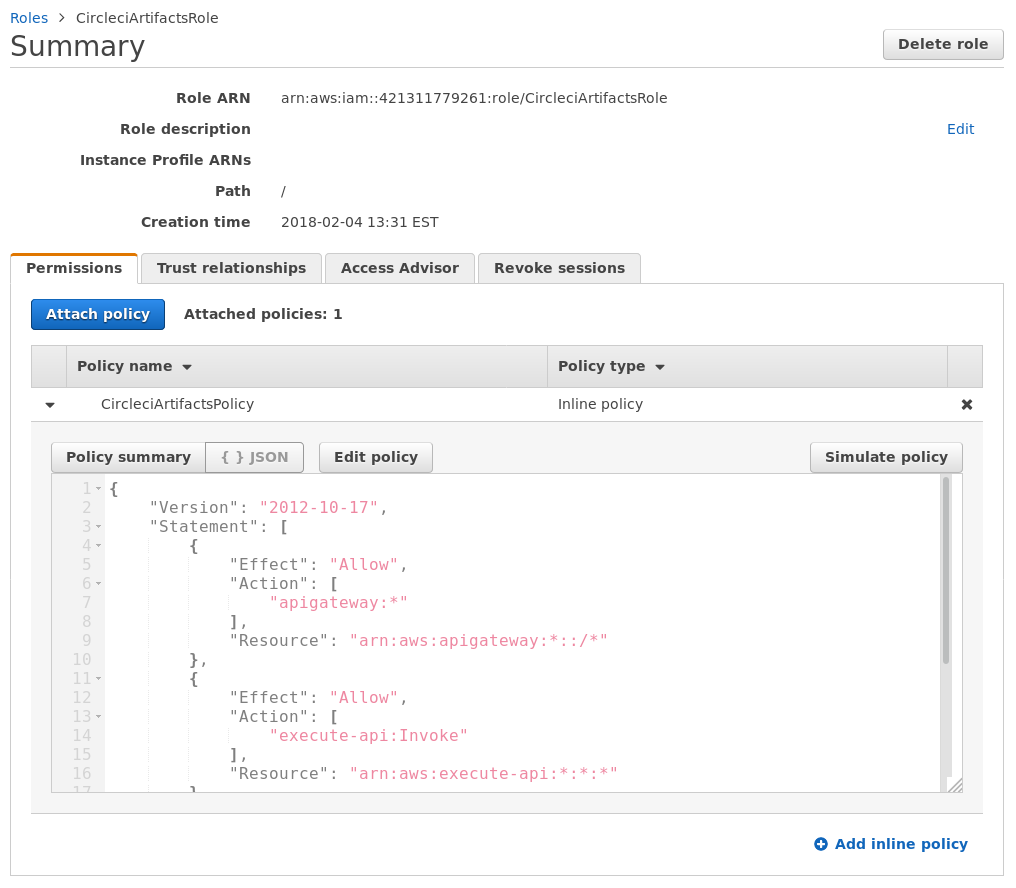
If all went well, you should be able to browse to your AWS IAM Console and see the CircleciArtifactsRole under the Roles tab with the contents of circleci-artifacts-policy.json listed as an in-line policy.
We’ll be doing all of the actual configuration via the AWS command-line interface, but it can be convenient to double-check how things are configured in the web interface.
Creating the Lambda Function
We’ll need to first package our Lambda function into a ZIP file before uploading it.
This can be done by invoking the zip command with the following options.
zip -r circleci-artifacts.zip app.js lambda.js node_modules/ package.json
Note that we’re including our app.js file which includes the actual service implementation, the lambda.js function which exports a Lambda handler, and node_modules which includes all of our dependencies.
To create a new Lambda function called CircleciArtifactsFunction, we can use create-function.
We’ll need to specify the ZIP file that we just included, the role ARN that we stored earlier, a function name, the Node runtime, and the fact that the handler is exposed as handler in the lambda.js file.
# Store the JSON response in a variable.
response="$(aws lambda create-function \
    --function-name CircleciArtifactsFunction \
    --zip-file fileb://circleci-artifacts.zip \
    --handler lambda.handler \
    --runtime nodejs6.10 \
    --role "${role_arn}")"

# Echo the response in the terminal.
echo "${response}"

# Store the function ARN for future usage.
function_arn="$(jq -r .FunctionArn <<< "${response}")"
This should echo a response similar to the following while also saving the Lambda function’s ARN in the function_arn environment variable.
{
    "FunctionName": "CircleciArtifactsFunction",
    "FunctionArn": "arn:aws:lambda:us-east-2:421311779261:function:CircleciArtifactsFunction",
    "Runtime": "nodejs6.10",
    "Role": "arn:aws:iam::421311779261:role/CircleciArtifactsRole",
    "Handler": "lambda.handler",
    "CodeSize": 664139,
    "Description": "",
    "Timeout": 3,
    "MemorySize": 128,
    "LastModified": "2018-02-04T18:51:08.917+0000",
    "CodeSha256": "kY4/je2Z6K2EuqqDVjMFfN7TU9pvr+oQRKf1cB/YJzs=",
    "Version": "$LATEST",
    "TracingConfig": {
        "Mode": "PassThrough"
    }
}
If you need to make any changes to the function implementation in the future, you can upload a new ZIP file using update-function-code.
aws lambda update-function-code \
    --zip-file fileb://circleci-artifacts.zip \
    --function-name CircleciArtifactsFunction
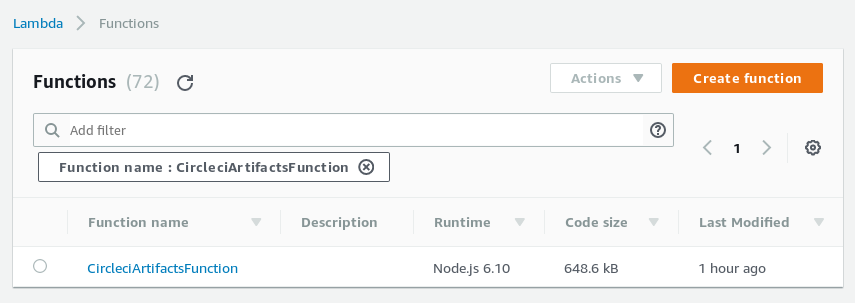
You can also view or modify the settings for the Lambda function by visiting the AWS Lambda Console. This will show you an overview of each of your Lambda functions, and you can click on each of them to browse the code, reconfigure them, etc.
Integrate the Function with API Gateway
When we packaged our original express app as a Lambda function, we had to use the aws-serverless-express library to translate a Lambda function handler invocation to something that our API endpoint could understand.
We’ll have to do sort of the opposite now to expose our Lambda function as an HTTPS endpoint; we’ll use API Gateway to translate API requests into Lambda function invocations that our lambda.handler handler can understand.
To do this, we’ll need to first create a new API in API Gateway using the create-rest-api command.
# Store the JSON response in a variable.
response="$(aws apigateway create-rest-api \
    --name CircleciArtifactsApi \
    --endpoint-configuration types=REGIONAL)"

# Echo the response in the terminal.
echo "${response}"

# Store the API ID for future usage.
api_id="$(jq -r .id <<< "${response}")"
Running the above command should output something similar to the following and store the REST API’s ID in api_id.
{
    "id": "q5zib8ntmd",
    "name": "CircleciArtifactsApi",
    "createdDate": 1517770561,
    "apiKeySource": "HEADER",
    "endpointConfiguration": {
        "types": [
            "REGIONAL"
        ]
    }
}
When we create this API, a root resource at / is created automatically.
We’ll need the ID if this resource in order to make new child resources, so we’ll have to make a query with get-resources to find the ID.
# Store the JSON response in a variable.
response="$(aws apigateway get-resources \
    --rest-api-id "${api_id}")"

# Echo the response in the terminal.
echo "${response}"

# Store the root resource ID for future usage.
root_resource_id="$(jq -r .items[0].id <<< "${response}")"
This will output something similar to the following, and the ID of the first–and only–resource will be stored in root_resource_id.
{
    "items": [
        {
            "id": "9gf08ayt1a",
            "path": "/"
        }
    ]
}
Next we’ll need to create a child resource that we’ll integrate with our Lambda function using create-resource.
Of particular note here, we’ll specify the path segment of the resource to be {proxy+}.
The proxy+ defines a greedy path variable that aws-serverless-express will expect to be present in the event passed to the handler.
This should match on any calls to our API, the proxy path will be extracted by aws-serverless-express, and the actual routing will ultimately be handled by our little express app as it would if we were running it locally..
# Store the JSON response in a variable.
response="$(aws apigateway create-resource \
    --rest-api-id "${api_id}" \
    --parent-id "${root_resource_id}" \
    --path-part '{proxy+}')"

# Echo the response in the terminal.
echo "${response}"

# Store the proxy resource ID for future usage.
proxy_resource_id="$(jq -r .id <<< "${response}")"
This will persist the new proxy resource ID, and should print out something similar to this.
{
    "id": "1a9nt4",
    "parentId": "9gf08ayt1a",
    "pathPart": "{proxy+}",
    "path": "/{proxy+}"
}
Now we’ll need to explicitly allow GET methods for this API resource using put-method.
We’ll also specify that no authorization is required to use this method.
aws apigateway put-method \
    --rest-api-id "${api_id}" \
    --resource-id "${proxy_resource_id}" \
    --http-method GET \
    --authorization-type NONE
This command should output something similar to the following, confirming that our method was added.
{
    "httpMethod": "GET",
    "authorizationType": "NONE",
    "apiKeyRequired": false
}
Now we’ll need to integrate this resource with our Lambda function using put-integration.
aws apigateway put-integration \
    --rest-api-id "${api_id}" \
    --resource-id "${proxy_resource_id}" \
    --http-method GET \
    --integration-http-method POST \
    --type AWS_PROXY \
    --uri "arn:aws:apigateway:us-east-2:lambda:path/2015-03-31/functions/${function_arn}/invocations" \
    --credentials "${role_arn}"
This should output something similar to the following.
{
    "type": "AWS_PROXY",
    "httpMethod": "POST",
    "uri": "arn:aws:apigateway:us-east-2:lambda:path/2015-03-31/functions/arn:aws:lambda:us-east-2:421311779261:function:CircleciArtifactsFunction/invocations",
    "credentials": "arn:aws:iam::421311779261:role/CircleciArtifactsRole",
    "passthroughBehavior": "WHEN_NO_MATCH",
    "timeoutInMillis": 29000,
    "cacheNamespace": "1a9nt4",
    "cacheKeyParameters": []
}
Finally, we can actually deploy our API with create-deployment.
We’ll need to specify a “stage” name which will namespace our API.
I chose v1 here, but this could be anything you want.
aws apigateway create-deployment \
    --rest-api-id "${api_id}" \
    --stage-name v1
Running this should output something similar to the following, but we won’t need to store the deployment ID (we can just indicate the same stage name later on).
{
    "id": "u46ban",
    "createdDate": 1517771345
}
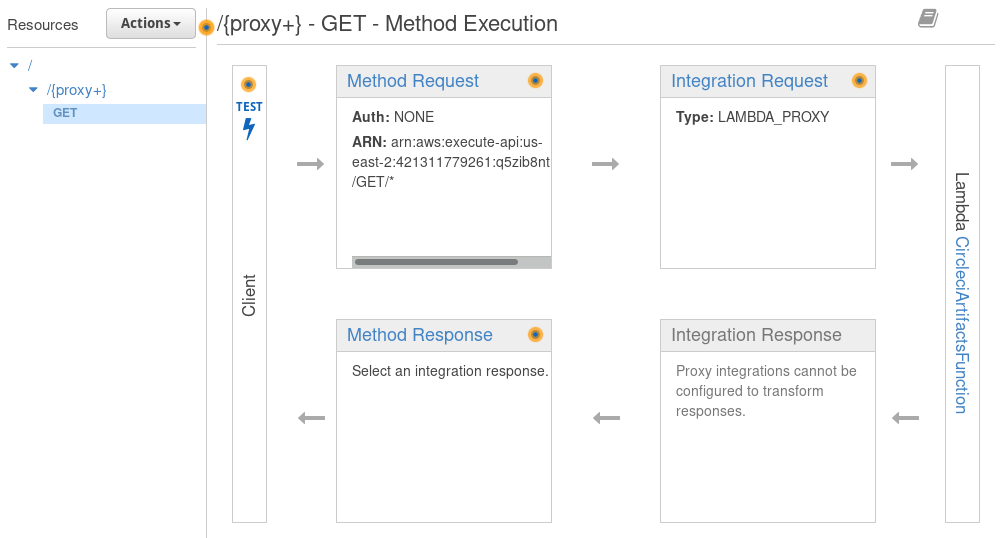
As with the other services, we can check on the status of the configuration by visiting the AWS API Gateway Console Page.
This allows us to see that the /{proxy+} path is indeed configured to invoke the CircleciArtifactsFunction on AWS Lambda.
At this point, the microservice should be available via the API Gateway deployment. The default URL for gateway deployments follows the following pattern.
https://{restapi-id}.execute-api.{region}.amazonaws.com/{stage}/)
Our REST API ID is q5zib8ntmd, our region is us-east-2, and our stage is v1.
This means that we should be able to run a command like
curl -L 'https://q5zib8ntmd.execute-api.us-east-2.amazonaws.com/v1/artifacts/intoli/exodus/coverage-report/total-coverage.json'
to access the latest version of the coverage-report/total-coverage.json resource.
If all has gone well so far, you will see an output similar to this.
{ "coverage": "92.01%" }
That’s all well and good, but it would be nice if we could host this under our own domain–particularly because we plan to provide this as a free public service.
Creating a Domain Certificate
The first step towards providing our API under a custom domain is to request and validate an SSL/TLS certificate for the domain from AWS Certificate Manager. API Gateway notably does not support HTTP, so either creating or uploading a certificate is mandatory.
There are a couple of ways that you can confirm ownership of a domain, but one of the easier ones is DNS validation. We can specify the validation method when we request the certificate with request-certificate.
# Store the JSON response in a variable.
response="$(aws acm request-certificate \
    --domain-name circleci.intoli.com \
    --validation-method DNS \
    --idempotency-token 1111)"

# Echo the response in the terminal.
echo "${response}"

# Store the certificate ID for future usage.
certificate_arn="$(jq -r .CertificateArn <<< "${response}")"
This will return the certificate’s ARN, but we’ll also need the DNS validation information.
{
    "CertificateArn": "arn:aws:acm:us-east-2:421311779261:certificate/a923006e-99e3-44d1-90f7-6c46afd6af6c"
}
We can access this information by using describe-certificate to request additional information about the certificate that we just created.
aws acm describe-certificate \
    --certificate-arn "${certificate_arn}"
This should echo something similar to the following.
{
    "Certificate": {
        "CertificateArn": "arn:aws:acm:us-east-2:421311779261:certificate/a923006e-99e3-44d1-90f7-6c46afd6af6c",
        "DomainName": "circleci.intoli.com",
        "SubjectAlternativeNames": [
            "circleci.intoli.com"
        ],
        "DomainValidationOptions": [
            {
                "DomainName": "circleci.intoli.com",
                "ValidationStatus": "PENDING_VALIDATION",
                "ResourceRecord": {
                    "Name": "_946a1367e885903942429328a5803d66.circleci.intoli.com.",
                    "Type": "CNAME",
                    "Value": "_e1941fc0533a52e5ac671f4612754725.acm-validations.aws."
                },
                "ValidationMethod": "DNS"
            }
        ],
        "Subject": "CN=circleci.intoli.com",
        "CreatedAt": 1517771494.0,
        "Status": "PENDING_VALIDATION",
        "KeyAlgorithm": "RSA-2048",
        "SignatureAlgorithm": "SHA256WITHRSA",
        "InUseBy": [],
        "Type": "AMAZON_ISSUED",
        "KeyUsages": [],
        "ExtendedKeyUsages": []
    }
}
The import part is the bit nested under Certifacte.DomainValidationOptions.ResourceRecord.
The Type key indicates that we’ll need to create a CNAME record on our domain to confirm ownership, then Name and Value indicate what the details of the record should be.
The exact details of how to create a CNAME record will vary depending on which domain registrar you use, but it should be relatively straightforward once you’re on the DNS settings page for the domain.
Shortly after creating the record, Amazon should confirm ownership and the certificate will be validated.
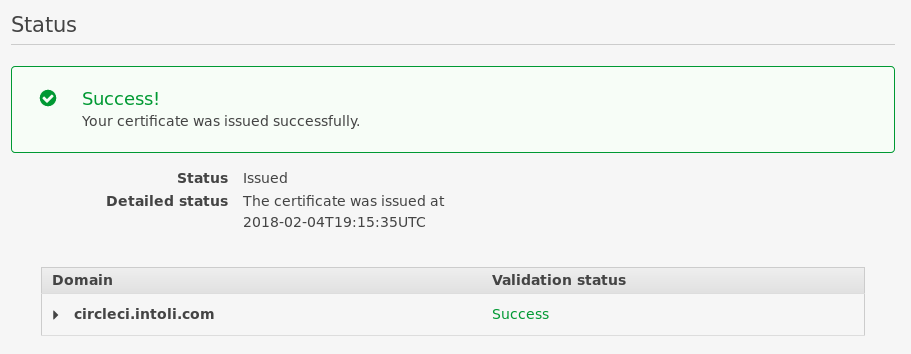
Once this happens, the value of Certificate.Status from the previous query should switch from PENDING_VALIDATION to ISSUED.
The status can also be checked on the AWS ACM Console Page. You should see a large success message under the domain status once the certificate has been issued.
Exposing the API on the Domain Name
Finally, we can associate our API with the circleci.intoli.com domain name.
To do this, we’ll specify the ARN of the certificate that we created for the domain to create-domain-name.
aws apigateway create-domain-name \
    --domain-name circleci.intoli.com \
    --endpoint-configuration types=REGIONAL \
    --regional-certificate-arn "${certificate_arn}"
Running that should output something similar to the following.
{
    "domainName": "circleci.intoli.com",
    "certificateUploadDate": 1517771830,
    "regionalDomainName": "d-km67v4p6g9.execute-api.us-east-2.amazonaws.com",
    "regionalHostedZoneId": "ZOJJZC49E0EPZ",
    "regionalCertificateArn": "arn:aws:acm:us-east-2:421311779261:certificate/a923006e-99e3-44d1-90f7-6c46afd6af6c",
    "endpointConfiguration": {
        "types": [
            "REGIONAL"
        ]
    }
}
The regionalDomainName key included in the response is the domain that we’ll need to point our domain to using a CNAME record.
The details of this will depend on your domain provider, but it should be fairly straightforward.
Now we just need to create a mapping of a path on the domain to our API using create-base-path-mapping.
We’ll leave off the actual --base-path option to signify that we want to map the root of the domain to the API (and the specific stage deployment).
aws apigateway create-base-path-mapping \
    --domain-name circleci.intoli.com \
    --rest-api-id "${api_id}" \
    --stage v1
This should echo out a response along these lines, confirming that the options that we specified were applied.
{
    "basePath": "(none)",
    "restApiId": "q5zib8ntmd",
    "stage": "v1"
}
Everything should be in place at this point, which we can confirm by visiting the API Gateway Console again and navigating to the Custom Domain Names tab.
The custom domain will be displayed and we can see that it’s properly linked to the ACM certificate and that / is mapped to stage v1 of the API.
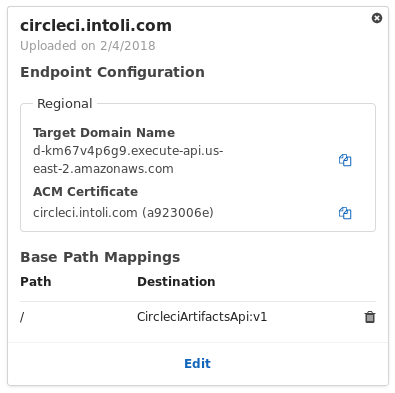
That all looks good, so we should now be able to access the API using the circleci.intoli.com domain.
Running
curl -L 'https://circleci.intoli.com/artifacts/intoli/exodus/coverage-report/total-coverage.json'
will confirm that we do indeed see the expected output.
{ "coverage": "92.01%" }
Using the API to Make a Coverage Badge
If you’ve made it this far through an article about continuous integration and AWS Lambda, then maybe, just maybe, you’ve seen a row of badges like this before.

In the off chance that you haven’t seen them before, they’re commonly placed in the README files of open source projects to act as a little status-dashboard for the project. They make it easy for somebody browsing a repository to get up to date build information about the project, and they look snazzy to boot.
One of the most popular providers for these type of badges is shields.io.
They have a number of built-in integrations–including some for CircleCI build statuses–but they also allow you to dynamically create badges using data from remote JSON files.
The fields to extract for these dynamic badges are specified using jsonpath.
It’s actually quite similar to the jq command that I used to extract fields from the AWS JSON responses, but the syntax is unfortunately a little different.
With jq, you would extract the value of a top-level coverage key with .coverage, while the equivalent query with jsonpath would be $.coverage (the $ is needed to specify the root of the object).
Using the proxy that we built in this tutorial, we can construct one of these dynamic coverage badges that will automatically display the latest test coverages.
The base URL for the dynamic badges is https://img.shields.io/badge/dynamic/json.svg and then we have to specify a handful of query string parameters.
The parameters that we’ll need are:
uri=https://circleci.intoli.com/artifacts/intoli/exodus/coverage-report/total-coverage.json- This is the URL where the JSON will be fetched from.query=$.coverage- This extracts the value of the top-levelcoveragekey from the fetched JSON.label=coverage- The text that shows up on the left side of the badge.colorB=ff69b4- The background color.prefix=- The prefix for the displayed value, it’s a required argument even if blank.suffix=- The suffix for the displayed value, also required.
Smooshing all that together into the src of an img tag allows us to finally construct a nice HTML coverage badge.
We’ll also wrap the image in a link to https://circleci.intoli.com/artifacts/intoli/exodus/coverage-report/index.html, so that it’s to see the latest full coverage report.
<a
  href="https://circleci.intoli.com/artifacts/intoli/exodus/coverage-report/index.html"
>
  <img
    src="https://img.shields.io/badge/dynamic/json.svg?label=coverage&colorB=ff69b4&prefix=&suffix=&query=$.coverage&uri=https://circleci.intoli.com/artifacts/intoli/exodus/coverage-report/total-coverage.json"
    alt="Coverage"
  >
</a>
When that code is placed in a project README on GitHub, it will render like this.
![]()
All Done
Even if you won’t personally make use of the API that we developed here, I hope that some of you found the step-by-step instructions for building an express-based microservice on AWS Lambda useful. Many of the serverless frameworks out there include high-level deployment commands, but I personally like to know exactly what resources are being provisioned and to have more explicit control over the process. I did a bit of searching around for guides, and the pickings seemed to be pretty slim when it came to setting things up manually–especially with regards to using the AWS command-line tools instead of the web console.
If you found this article useful, then please keep Intoli in mind for your future consulting and contracting needs. Backend, frontend, infrastructure, web scraping, machine learning, data analysis, or whatever else floats your boat. If you’re buying, we’re selling.
Suggested Articles
If you enjoyed this article, then you might also enjoy these related ones.

Performing Efficient Broad Crawls with the AOPIC Algorithm
Learn how to estimate page importance and allocate bandwidth during a broad crawl.
Breaking Out of the Chrome/WebExtension Sandbox
A short guide to breaking out of the WebExtension content script sandbox.

User-Agents — Generating random user agents using Google Analytics and CircleCI
A free dataset and JavaScript library for generating random user agents that are always current.
Comments