By Evan Sangaline | August 17, 2017
Sometimes during the course of testing or web scraping with Google Chrome, you might desire to clear the browser cache and cookies with Selenium.
You can of course call driver.close() on your current ChromeDriver instance and then provision a new one.
The fresh instance of Chrome will start with a clean browser history, cookies, and cache.
There are however times when this method loses other state that you may want to preserve.
The functionality to clear the cache directly is unfortunately not built into the WebDriver specification. Luckily, if you get a bit creative then you can accomplish the same thing by using Selenium to interact with Chrome’s setting interface. If you navigate to chrome://settings/clearBrowserData in a Chrome browser then you’ll see something that looks like this.
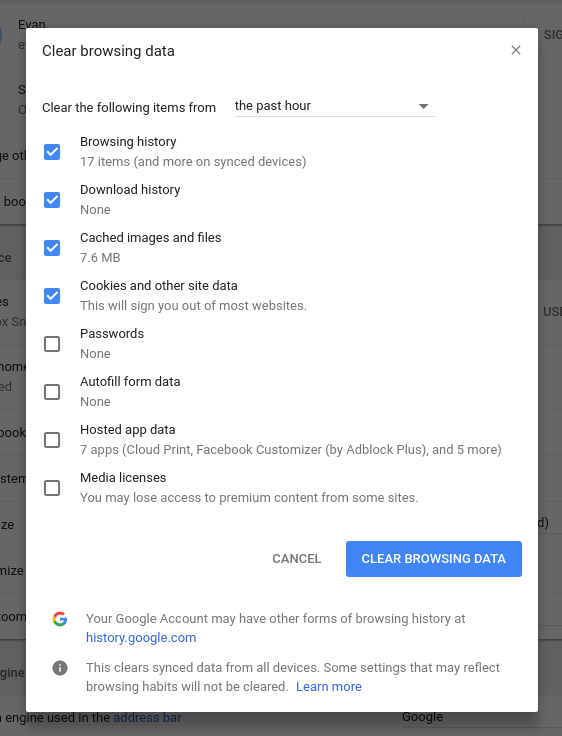
You can navigate to this same page with Selenium by executing driver.get('chrome://settings/clearBrowserData').
Then it’s just a matter of clicking the “CLEAR BROWSER DATA” button to actually clear the cache.
We can right click on the button and then click on “Inspect” to open the Chrome Developer Tools.
This will highlight the button element and allow us to find its id.
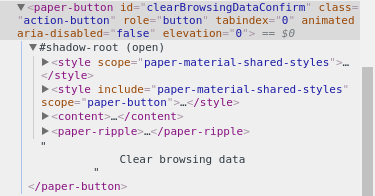
We can see that the button’s id is clearBrowsingDataConfirm.
Your first thought might be that you can call driver.find_element_by_id('clearBrowsingDataConfirm').click() here to find the DOM element and click it.
Unfortunately, this won’t work because the Chrome settings page uses Polymer and WebComponents.
While these things are great for development, they can be a little bit of a headache when dealing with Selenium because of the shadow roots.
Fortunately, if we execute our query selector using the /deep/ combinator, we’re able to pierce through the shadow roots.
The magic selector in this case is * /deep/ #clearBrowsingDataConfirm.
We can use this to construct a method for clearing the cache which also handles explicit waits for us.
from selenium.webdriver.support.ui import WebDriverWait


def get_clear_browsing_button(driver):
    """Find the "CLEAR BROWSING BUTTON" on the Chrome settings page."""
    return driver.find_element_by_css_selector('* /deep/ #clearBrowsingDataConfirm')


def clear_cache(driver, timeout=60):
    """Clear the cookies and cache for the ChromeDriver instance."""
    # navigate to the settings page
    driver.get('chrome://settings/clearBrowserData')

    # wait for the button to appear
    wait = WebDriverWait(driver, timeout)
    wait.until(get_clear_browsing_button)

    # click the button to clear the cache
    get_clear_browsing_button(driver).click()

    # wait for the button to be gone before returning
    wait.until_not(get_clear_browsing_button)
This clear_cache(driver) method will clear the browsing data in the same way that a user would.
If you execute it, by using
from selenium import webdriver

driver = webdriver.Chrome()

clear_cache(driver)
for example, then you can the UI update as the cache is cleared.
It’s worth noting, that you can easily extend this to include more fine-grained control.
The default behavior is to only clear the cache from the last hour.
This is probably more than enough for most testing scenarios, but you can easily modify the value of select#dropdownMenu to select other options.
Similarly, you can select or unselect the various checkboxes to control “Browsing history,” “Download history,” “Cached Images and files,” “Cookies and other site data,” “Password,” “Autofill form data,” “Hosted app data,” and “Media licenses.”
The key for all of these is just to use /deep/ in the selectors to get through the shadow root.
Anyway, if you found this from Google then I hope you found it helpful! It’s relatively straight forward once you see how it’s done, but I could find any information out there on how to accomplish it. If you’re struggling with other technical issues, please keep in mind that we’re available for consulting!
Suggested Articles
If you enjoyed this article, then you might also enjoy these related ones.
Breaking Out of the Chrome/WebExtension Sandbox
A short guide to breaking out of the WebExtension content script sandbox.

Recreating Python's Slice Syntax in JavaScript Using ES6 Proxies
A gentle introduction to JavaScript proxies where we use them to recreate Python's extended slice syntax.
Building a YouTube MP3 Downloader with Exodus, FFmpeg, and AWS Lambda
A short guide to building a practical YouTube MP3 downloader bookmarklet using Amazon Lambda.
Comments