By Evan Sangaline | August 31, 2018
We recently created a public Slack community dedicated to web scraping in order to provide a general forum for people to discuss topics related to browser automation, headless browsers, scraping frameworks, data pipelining, or anything else along those lines. We wanted it to be open to anyone who wanted to join, but Slack unfortunately doesn’t really provide any sort of open-access Slack communities or channels. If you want to make your Slack community open to anybody, then your options are to either send invitations to anyone who expresses interest, or to generate shared invite URLs which expire after four weeks. Needing to update invitation URLs frequently is a bit of a hassle, so the majority of public Slack communities opt to create their own invitation forms.
There are a handful of nice open-source projects which facilitate running a backend to handle Slack invitation form submissions, such as slackin, slack-invite-automation, and slack-invite. These are nice enough, but managing any backend app creates operational overhead, and it seems like overkill for something as simple as an invitation form. Instead of going with one of these existing solutions, we decided to piece together a custom form which uses a combination of Google Sheets and Google Forms to process form submissions and send out invitations.
This solution is reliable, free, and can be hosted on any static site. Our end result looks like this, but your own form can be styled however you want with CSS.
The Web Scrapers Slack Community
Want to link up with other developers interested in web scraping? Join the Web Scrapers Slack Channel to chat about Selenium, Puppeteer, Scrapy, or anything else related to web scraping.
In the rest of this tutorial, we’ll walk through the process of creating a Slack Channel, and building an invitation form like this one. The process is fairly straightforward, and we hope that it will be a useful alternative to hosting your own backend to handle invitations.
Create a Slack Workspace
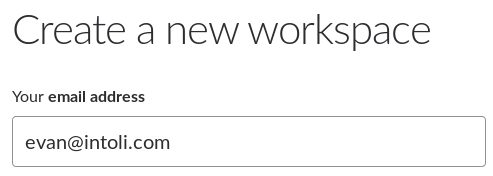
The first thing that you’ll need to do is to actually create the Slack workspace for your community. This process is fairly intuitive if you’ve used Slack before, so feel free to skip ahead to Create a Google Form if you have this handled already. Otherwise, you can begin by visiting slack.com/create where you’ll be greeted by a form prompting you to enter your email address.
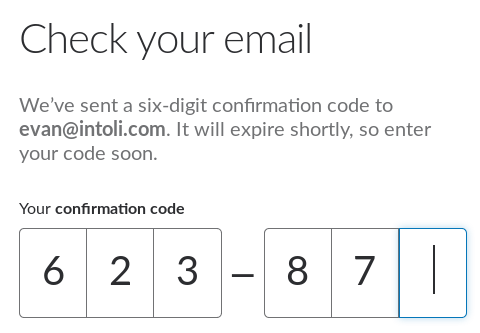
After you submit your email address, Slack will send you an email with a six digit confirmation code. You’ll need to enter this code on the next page before you can proceed further.
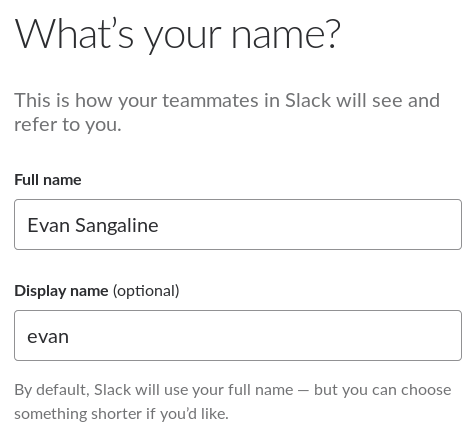
Next, Slack will ask you to fill out your name and your display name for use in the Slack community. Note that the full name will be included in the invitation emails, so you may wish to use something other than your actual name (like the name of your organization).
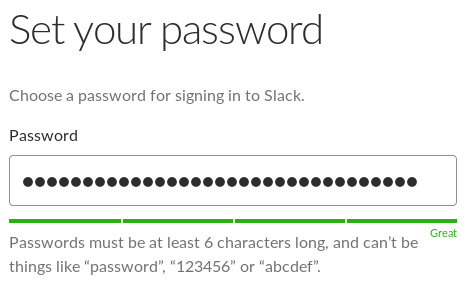
The password is fairly self-explanatory, but bear in mind that this account will have full administrator access to the workspace.
After your personal information has been filled out, Slack will ask you about the workspace that you’re creating. “Shared interest group” seems most fitting for a public Slack workspace, but choose whichever you think is most appropriate for your group.
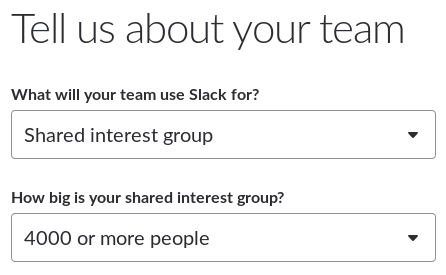
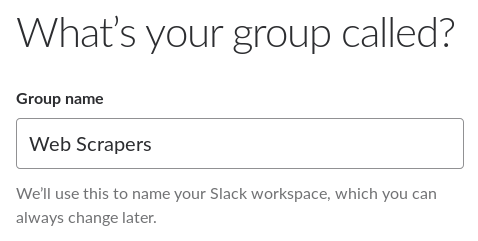
Next, you’ll be able to give your group a name.
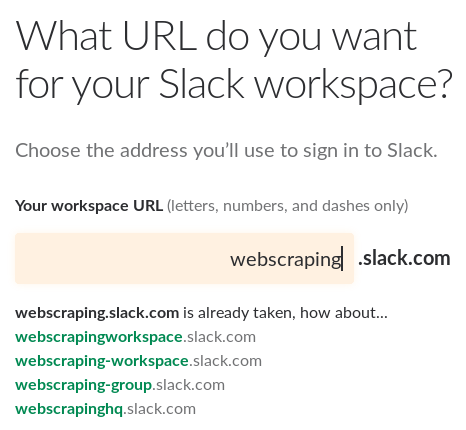
And finally, you can pick the URL for the community. Slack gives you real-time feedback about the availability of different URLs, so it’s easy to try things out and find something that’s a good match.
You’ll also be asked about inviting other users after choosing your workspace URL, but that step is optional. Feel free to skip that and just send people a link to your signup form later on.
Create a Google Form
You’ll need a Google account for the remaining steps, so be sure to create one first if you don’t already have one. After that, visit the Google Forms homepage where you should be greeted with a prompt to create a new form using any one of a variety of templates.
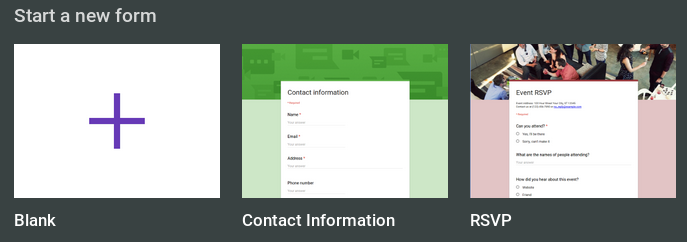
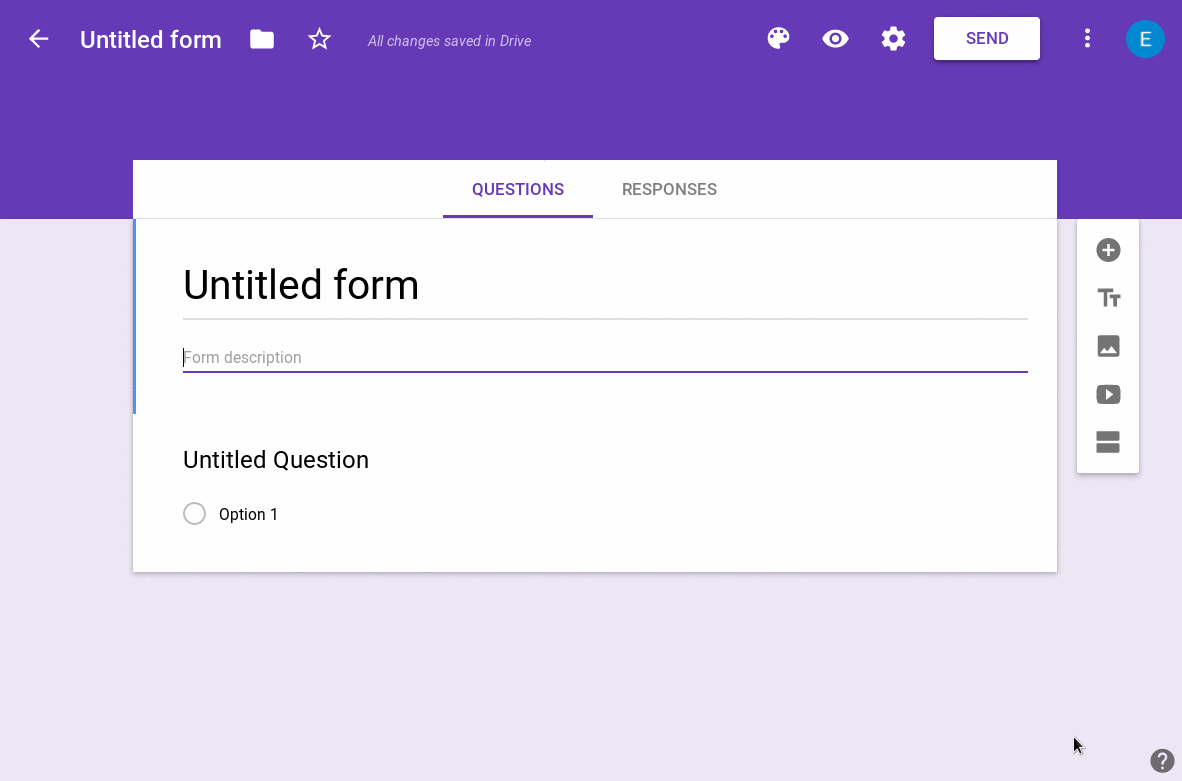
The slack invitation form will only require a single email field, so it’s easiest to just pick the “blank” template and customize things from there. In fact, even the blank template comes with a default question that you’ll need to remove. To do so, click on “Untitled Question” and then click the trash-can icon towards the bottom of the screen.
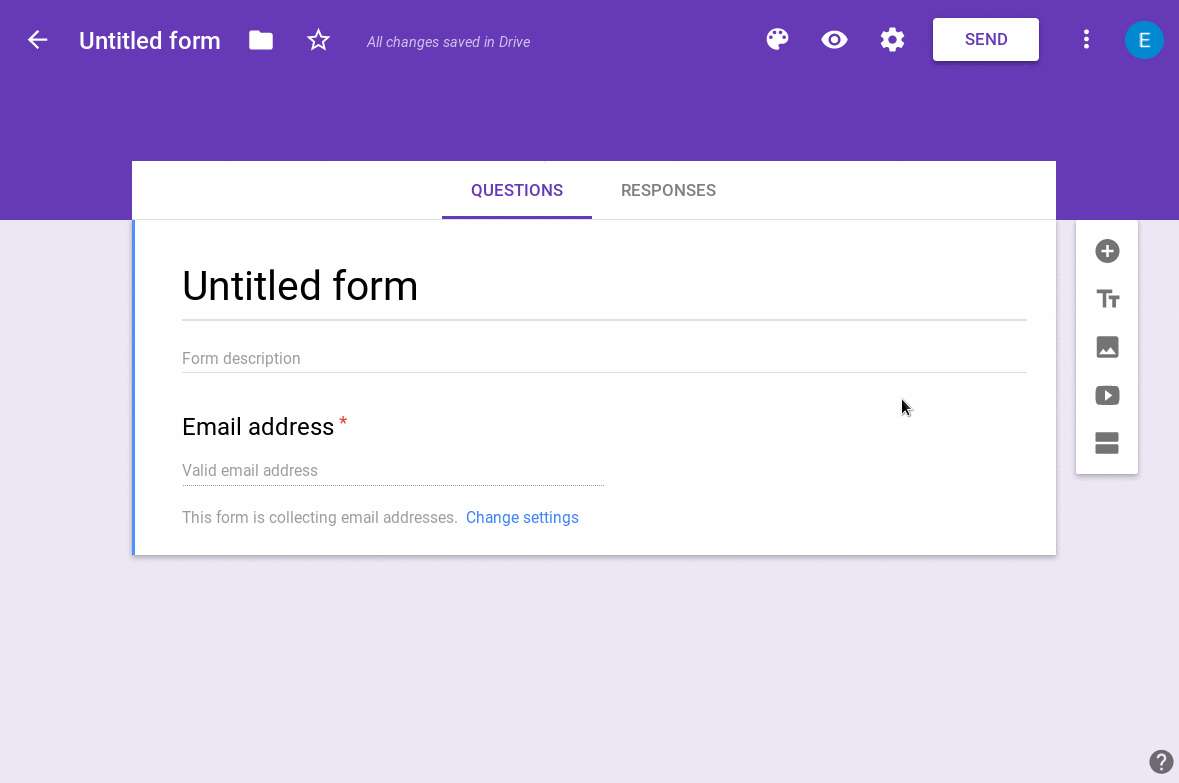
You’ll also need to click on the settings-gear icon in the upper right corner of the screen, and select the “Collect email addresses” option. This will result in a form with a single email address input. Even if you plan on using your own custom form for signups, the title of your form will be displayed to users after they request an invitation. It’s a good idea to give the form a title that ties it directly to the intended action, like “Web Scrapers Slack Community Invitation Request.” If you plan to use an embedded Google form instead of a custom one, then you can configure the Google form styling here as well.
Next you’ll want to link your form to a spreadsheet by first clicking on “Responses” and then navigating into “Select response destination.” I chose to create a new spreadsheet here, but you could also select an existing one.
Now whenever someone submits this form, both the submission time and the email address will be added to whichever spreadsheet you linked it to. We’ll add a script to that spreadsheet later on that will handle sending out the automated invitation emails.
Build a Custom Form that Submits to Google
You can embed Google’s autogenerated form page on your site, but it adds a nice touch to use a custom HTML form on your own site. The process of setting this up is actually pretty simple too. Start by clicking on the preview icon that looks like an eye in the upper right corner of the Google Forms webpage.
![]()
This will open your actual form in a new window. Next, right click on the form and choose “Inspect Element” from the context menu that pops up. Doing so will open the developer tools for the page, and allow you to explore the form’s HTML code.
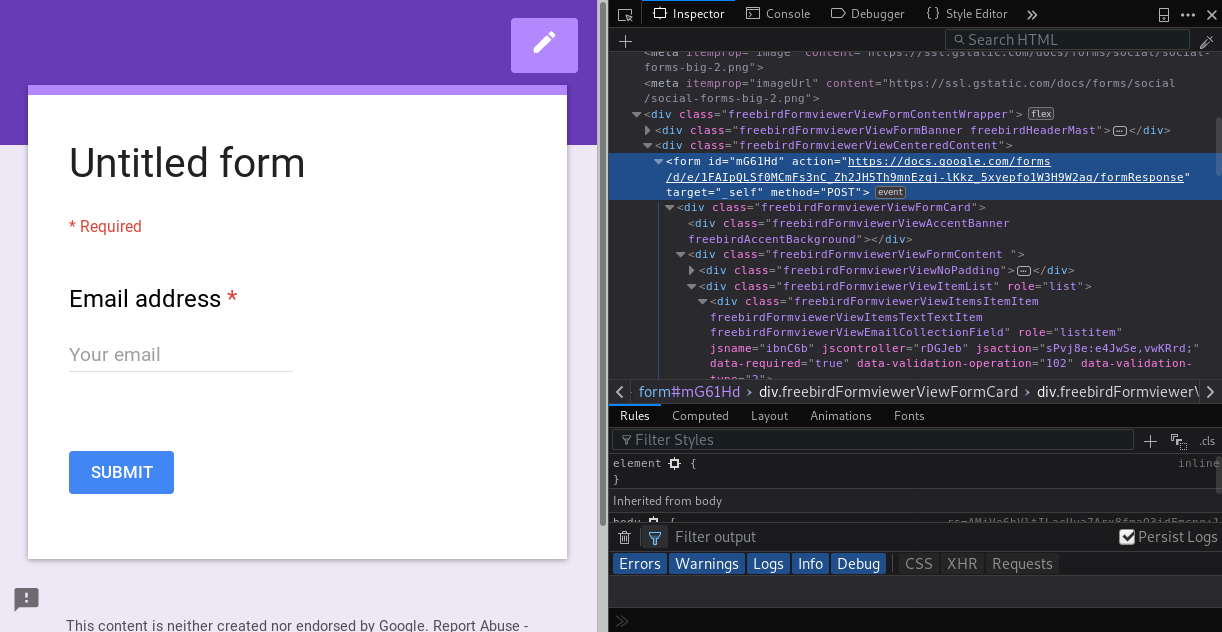
You’ll want to find the actual form element in the inspector, as I’ve done in the screenshot above.
There’s only one piece of information that you need to extract from the form: the value of the action tag which specifies the submission URL for the form.
This should start with https://docs.google.com/forms/ and contain a long string of random characters that identify your specific form.
If you click on the URL in the inspector frame, then the URL will become selected so that you can copy and paste it.
There are then two things that you need to do to link up your custom form so that submissions will end up in Google Sheets: you need to specify the same action and method attributes on the form, and you need to include an input element with name="emailAddress".
A minimal example of that might look something like this.
<form
  action="//docs.google.com/forms/<REPLACE-THIS-PART-WITH-YOUR-FORM'S-INFO>"
  method="post"
  target="_blank"
>
  <input
    autocomplete="email"
    name="emailAddress"
    placeholder="Your email"
    type="email"
  >
  <button
    type="submit"
  >
    Invite Me!
  </button>
</form>
This will result in a fairly plain form by default, but you can of course style it using CSS and add whatever other content you want to the form.
If you right click on the webscrapers.slack.com invitation form below, and open the inspector like we did above, then you can see a more complex example of how the form can be customized.
The Web Scrapers Slack Community
Want to link up with other developers interested in web scraping? Join the Web Scrapers Slack Channel to chat about Selenium, Puppeteer, Scrapy, or anything else related to web scraping.
Generate a Slack API Token
In order to actually send out the invitations, we’ll be interacting with the Slack API. Sending invitations requires administrator privileges, and the easiest way to construct a token with the right privileges is to use Slack’s older legacy tokens. It’s generally a good idea to use their newer tokens with more fine-grained permissions when you’re building an integration that only requires limited permissions, but this is far less important when your integration requires admin privileges like ours does.
To create a legacy token, first visit api.slack.com/custom-integrations/legacy-tokens. You should see your recently created workspace listed with a button that says “Create token.” Click on that button to proceed with generating a legacy API token.
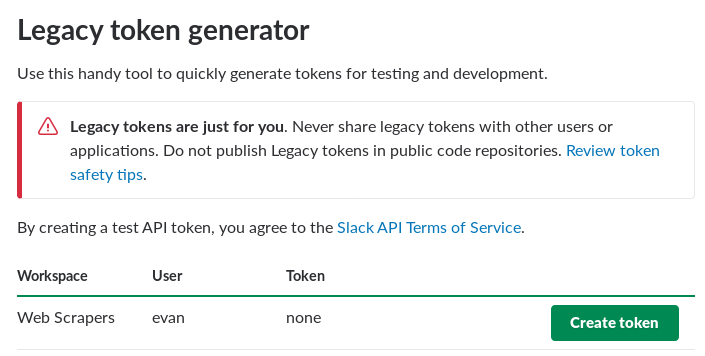
Note that it may prompt you to enter your password, and then require you to click the same “Create token” button a second time.
Once the token generation process has completely successfully, you should see a token listed that looks something like this: xoxp-385009056739-934827559323-039482759384-30ae13990a9dea0a999da09ad99dfe0a.
You’ll need to hold on to this token because we’ll need to use it in the next step of the integration.
Sending Invitations After Form Submission
The final step is where the magic happens. We told Google Forms to send form submission data to the spreadsheet we linked earlier, and now we’ll use Google Apps Script to automatically send out invitations every time that happens. First, navigate to Google Sheets and open up whatever sheet you linked to your form. The spreadsheet should include two columns, “Timestamp” and “Email Address,” and will look something like this if you haven’t submitted the form yet for testing.
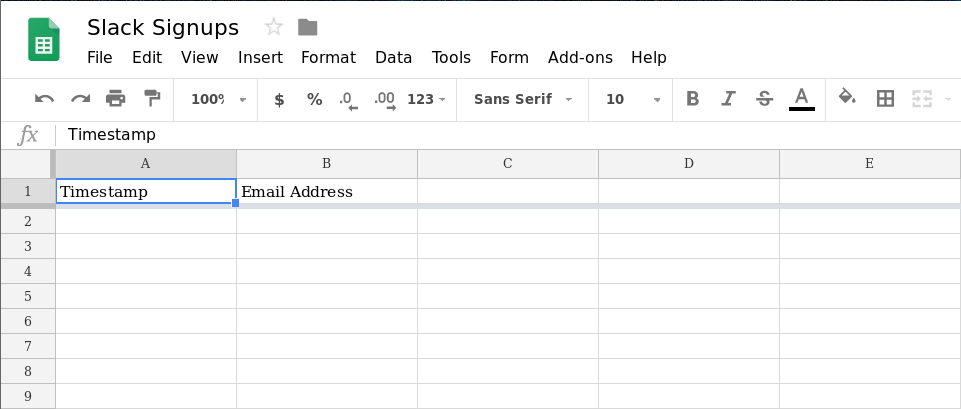
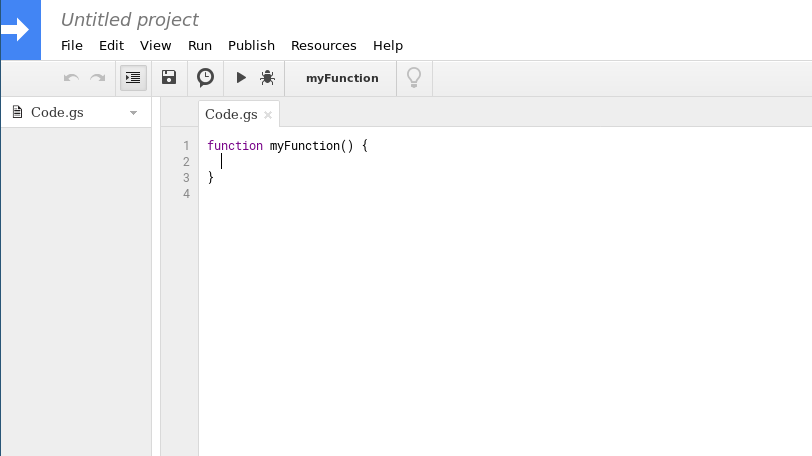
This sheet will automatically fill up with new entries whenever somebody submits your invitation form, and you can always come back here in the future to see how many people have signed up. For now though, click on “Tools” in the top-menu bar, and then “Script editor” in the menu that pops up. This should open a script editor in a new window which will look like this.
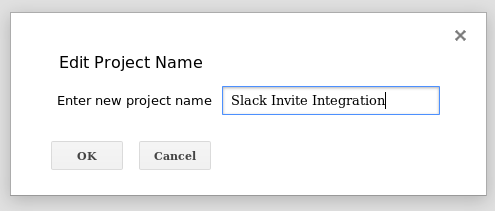
Next, click on “Untitled project” and give your script’s project a name in the popup that appears.
Now we just need to write a short script which adds an event listener for form submissions that handles sending out invitations using Slack’s API. Google App Script scripts run using Rhino–which is a bit behind the times–so we have to be careful about which ES6 syntax we use. For example, arrow functions and template strings aren’t supported. We’ll also need to use the built-in global objects like Logger, ScriptApp, UrlFetchApp to interact with Google’s services and to make the API request to Slack. I wouldn’t go into detail on how those work here, but you can follow those links to learn more about them.
Copying and pasting the following code into the editor, and editing workspace/token to reflect your own settings, should do the trick nicely.
/**
 * Configure this `slack` object with the name of your workspace and the legacy API token.
 * These will be used to automatically send invitations using Slack's API whenever the
 * invitation form is submitted.
 */
var slackConfig = {
  workspace: 'webscrapers',
  token: 'xoxp-385009056739-934827559323-039482759384-30ae13990a9dea0a999da09ad99dfe0a',
};


/**
 * Handles form submission events by sending invitation emails using Slack's API.
 */
function sendInvitation(event) {
  // Extract the form data from the event.
  const timestamp = event.values[0];
  const emailAddress = event.values[1];

  // Log a message about sending the invitation.
  Logger.log('Invitation request received at ' + timestamp + ' for ' + emailAddress + '.');

  // Use Slack's API to send the invitation.
  const url = (
    'https://' + slackConfig.workspace + '.slack.com/api/users.admin.invite' +
    '?email=' + encodeURIComponent(emailAddress) +
    '&token=' + encodeURIComponent(slackConfig.token)
  );
  const response = UrlFetchApp.fetch(url);
  const status = response.getResponseCode();
  const responseText = response.getContentText();

  // Log the outcome.
  if (status >= 200 && status <= 299) {
    Logger.log('Invitation successfully sent to ' + emailAddress + '.');
  } else {
    Logger.log('Invitation sending failed for ' + emailAddress + ': ' + responseText);
  }
}


/**
 * Attaches the `sendInvitation()` method to a trigger that fires whenever
 * the invitation form is submitted.
 */
function attachSendInvitationHandler() {
  // This is the name of the function that will handle form submissions.
  const handlerFunction = 'sendInvitation';

  // Bail out if the trigger already exists.
  const alreadyAttached = ScriptApp
    .getProjectTriggers()
    .some(function (trigger) {
      return trigger.getHandlerFunction() === handlerFunction
    });
  if (alreadyAttached) {
    return;
  }

  // Create a new trigger that will call our handler when the form is submitted.
  ScriptApp
    .newTrigger(handlerFunction)
    .forSpreadsheet(
      SpreadsheetApp.getActiveSpreadsheet()
    )
    .onFormSubmit()
    .create();
}
Once you’ve updated the slackConfig object, you can press Ctrl-S to save the project.
You’ll then want to select “Run” from the menu bar, then select “Run function,” and finally select the attachSendInvitationHandler() method to be run.
This method will simply register the sendInvitation() callback to handle any form submissions for the spreadsheet if it hasn’t been registered already.
That method will in turn make a request to Slack’s /api/users.admin/invite endpoint to send out an invitation email, and log some useful information along the way.
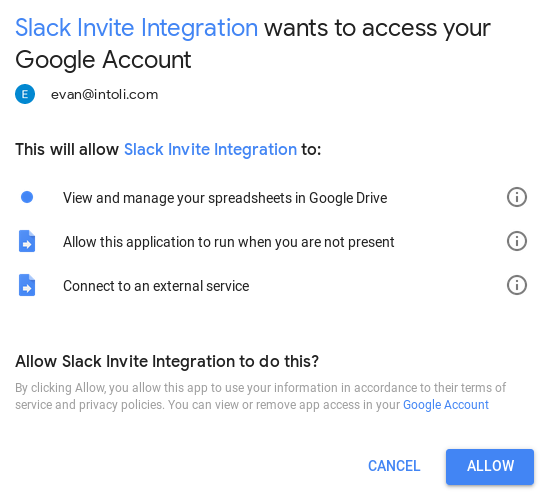
Either when saving, or when attempting to run attachSendInvitationHandler(), you should be prompted to grant the app permissions.
You may need to verify your account, and you will then see a scary message about the app not being verified.
This would normally be something that you should worry about, but it’s not verified in this case because we literally just created it.
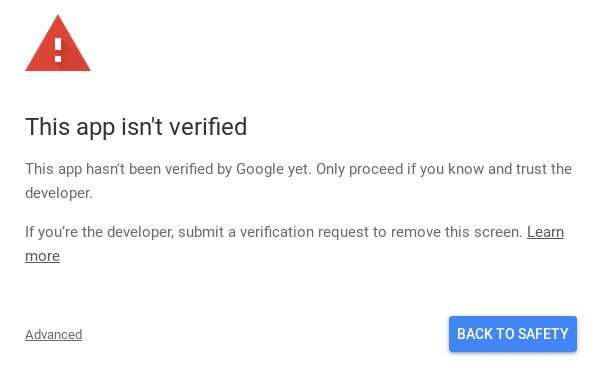
To get past this warning, you need to click on “Advanced” which will display some additional options.

Here, you’ll want to click on “Slack Invite Integration (unsafe)” (or whatever the equivalent is if you named your project differently. Finally, you’ll click the “ALLOW” button which will grant your script the necessary permissions.
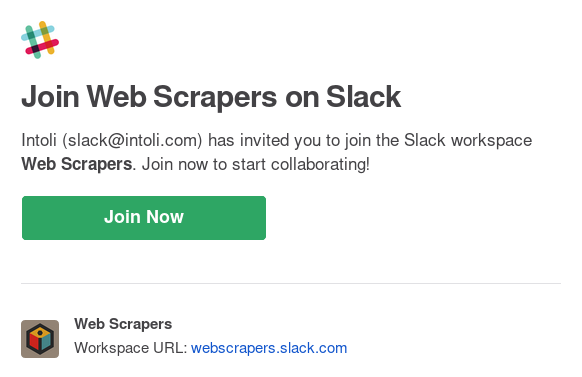
Once access has been granted, everything should be good to go! You can submit the invitation form yourself for testing, and if everything is connected correctly, then you should receive an email like this in your inbox.
If you don’t receive the email, then you can try running the attachSendInvitationHandler() again, or press Ctrl+Enter in the script editor to review the logs.
You can now place your invitation form somewhere on your own website, and visitors will be able to send themselves invitations to your public Slack community. Any new signups will also accumulate in the spreadsheet, so you can check back there to keep an eye on how your community is growing.
Wrap Up
If you used this guide to set up your own public Slack community, then we would love to hear about it. Please feel free to leave a comment about it below, and we’ll be sure to check it out. Oh, and if you’re interested in web scraping, then be sure to sign up for the Web Scrapers Slack Community too!
The Web Scrapers Slack Community
Want to link up with other developers interested in web scraping? Join the Web Scrapers Slack Channel to chat about Selenium, Puppeteer, Scrapy, or anything else related to web scraping.
Suggested Articles
If you enjoyed this article, then you might also enjoy these related ones.

Performing Efficient Broad Crawls with the AOPIC Algorithm
Learn how to estimate page importance and allocate bandwidth during a broad crawl.
Breaking Out of the Chrome/WebExtension Sandbox
A short guide to breaking out of the WebExtension content script sandbox.

User-Agents — Generating random user agents using Google Analytics and CircleCI
A free dataset and JavaScript library for generating random user agents that are always current.
Comments