By Andre Perunicic | January 27, 2018
If you use Selenium for automated testing or web scraping, you may have discovered that there is no built-in utility for clearing browser resources like cookies, cached scripts, and objects in local storage. This is not particularly surprising given that the WebDriver specification that Selenium uses behind the scenes has no provision for clearing the cache. However, lingering cached resources can cause your tests to pass when they shouldn’t, prevent your scrapers from quickly starting clean sessions on demand, and cause all sorts of undesirable behavior besides. Fortunately, there’s still a way out! In this article I’ll describe how to clear the Firefox browser cache with Selenium. The code will be written in Python, but you should be able to adapt it to other languages without much difficulty.
If all you’re interested in is the end-result, take a look at the finished utility in Intoli’s article code repository. The rest of the article will describe what this utility actually does. The technique is quite similar to the one used to clear the Chrome browser cache, also published on our blog, so head on over there if you prefer using Chrome with Selenium.
Clearing the Cache
Update: These instructions have been updated to work with Firefox 61, released on June 26, 2018. The cache clearing process is quite similar for older versions of Firefox, and the slightly different cache clearing script written for Firefox 57 is still available in our article materials repository.
We’ll clear the cache by emulating how a human would accomplish the task: by visiting Firefox’s preferences page and going through the appropriate UI interactions.
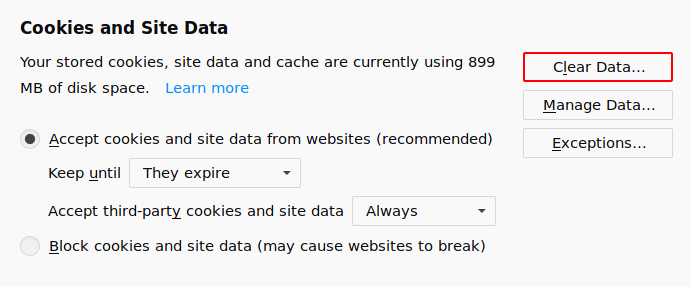
The options we care about are in the Browser Privacy section of the Preferences page which you can access by visiting about:preferences#privacy in Firefox.
Let’s first review the steps that the cache clearing script will need to perform, and then describe how to actually go about implementing them with Selenium.
Our script first needs to click the “Clear Data…” button which is highlighted in red in the screenshot below.
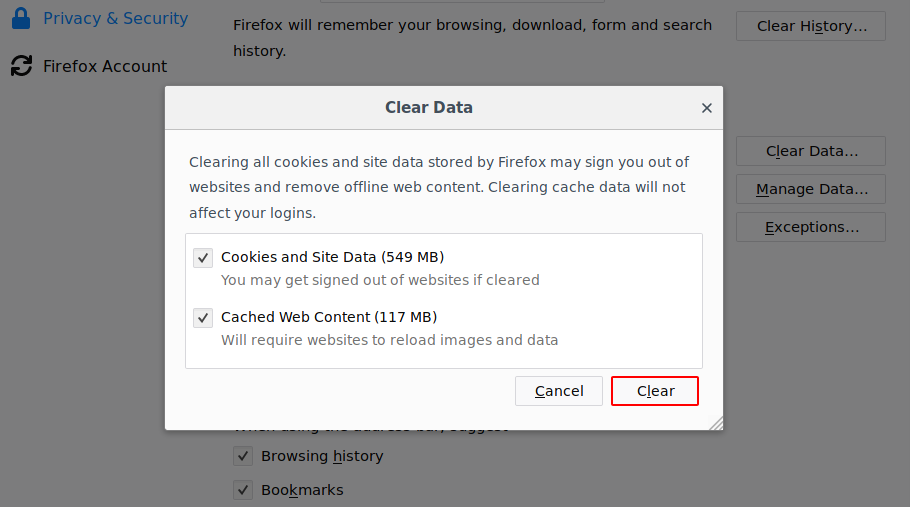
This will open an in-page dialog listing the types of data to be cleared. Since both “Cookies and Site Data” and Cached Web Content" are preselected in this dialog, all our script has to do here is to click the “Clear” button.
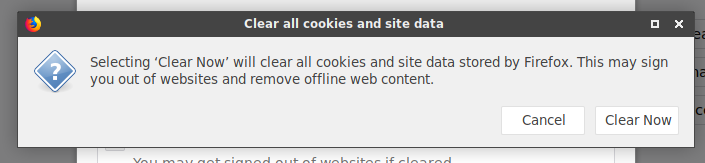
Clicking the “Clear” button will launch an alert, which the script will have to accept in order to successfully clear the cache, cookies, and site data.
Writing the Cache Clearing Script
Now that we know what needs to be done, let’s examine the page in detail and figure out how to execute each step. The Preferences page is coded in Mozilla’s XML-based XUL interface-building language. Fortunately, XUL is similar enough to HTML that both Selenium and JavaScript can interact with elements on the page. I’ll first show you the completed script, and then talk through it piece by piece:
from selenium.webdriver.common.alert import Alert
from selenium.webdriver.support import expected_conditions as EC
from selenium.webdriver.support.ui import WebDriverWait


dialog_selector = '#dialogOverlay-0 > groupbox:nth-child(1) > browser:nth-child(2)'

accept_dialog_script = (
    f"const browser = document.querySelector('{dialog_selector}');" +
    "browser.contentDocument.documentElement.querySelector('#clearButton').click();"
)


def get_clear_site_data_button(driver):
    return driver.find_element_by_css_selector('#clearSiteDataButton')


def get_clear_site_data_dialog(driver):
    return driver.find_element_by_css_selector(dialog_selector)


def get_clear_site_data_confirmation_button(driver):
    return driver.find_element_by_css_selector('#clearButton')


def clear_firefox_cache(driver, timeout=10):
    driver.get('about:preferences#privacy')
    wait = WebDriverWait(driver, timeout)

    # Click the "Clear Data..." button under "Cookies and Site Data".
    wait.until(get_clear_site_data_button)
    get_clear_site_data_button(driver).click()

    # Accept the "Clear Data" dialog by clicking on the "Clear" button.
    wait.until(get_clear_site_data_dialog)
    driver.execute_script(accept_dialog_script)

    # Accept the confirmation alert.
    wait.until(EC.alert_is_present())
    alert = Alert(driver)
    alert.accept()
First up, let’s talk about the “Clear Data” button that we need to start with.
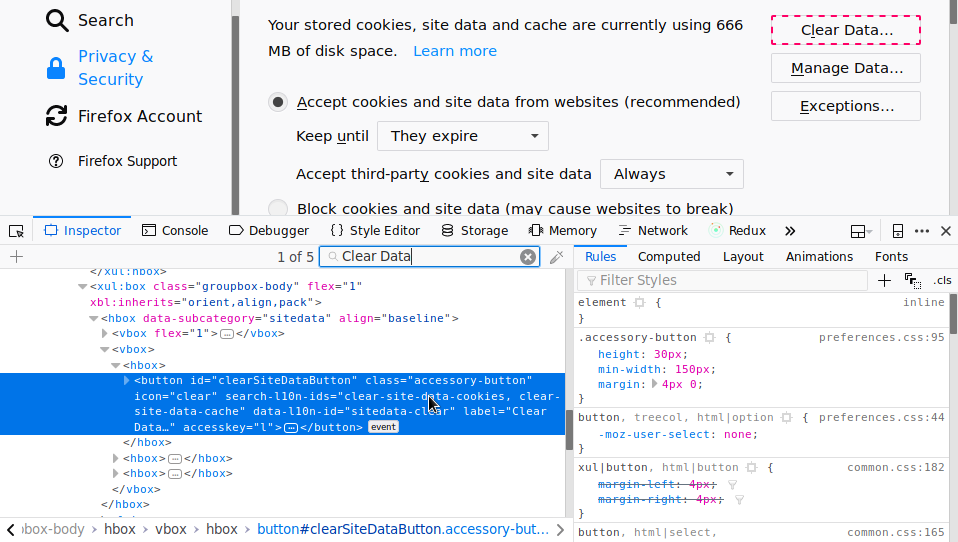
While right-clicks are not available and we cannot examine the target buttons directly, we can pull up Firefox’s developer tools and locate the elements we need to interact with in the Inspector tab.
Searching for “Clear Data” in the Inspector reveals that the first button we need to click is identified by id #clearSiteDataButton.
Clicking a button in Selenium is pretty easy.
In the script above, I use the get_clear_site_data_button() function to find the button on the page, wait for it to become available with wait.until(), and then click it with .click().
Using a dedicated function like this is convenient because it allows us to ensure that the target element is available before attempting to interact with it.
Next, we want to accept the resulting modal dialog.
Click the “Clear Data” button to open the dialog, and then jump into the Inspector once again (I searched for “Clearing all cookies” from the dialog’s description to find it).
You’ll see that the button has #clearButton as its id.
However, the button clicking code I just described won’t work in this case.
You can also verify this by evaluating
document.querySelector('#clearButton')
in the development tools’ console, and seeing that it results in null.
This happens because the modal dialog is nested inside an iframe-like XUL browser element.
The fact that it’s not actually an iframe seems to prevent Selenium from interacting with it properly, but fortunately we can get to the button pretty easily from JavaScript.
Although we could stuff more of the script into JavaScript, separating the steps lets use waits consistently, and can help diagnose at which point the script fails if the interface changes in the future.
To write the script, right click on the browser element in the Inspector and get its selector from there:
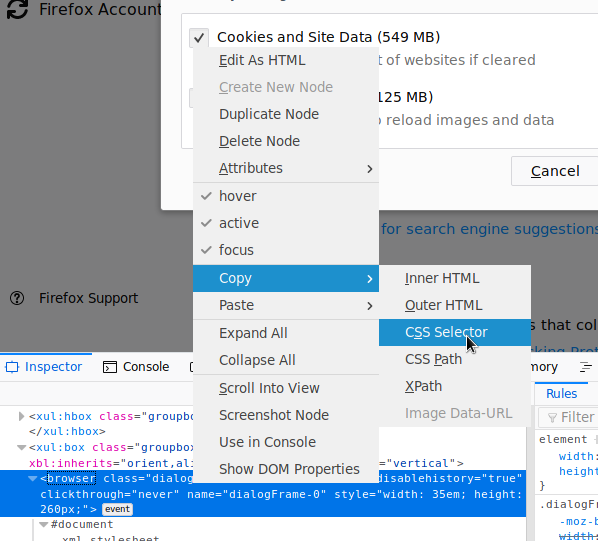
Then, navigate to the nested document (similarly to how it’d be done for an iframe), and click the button by evaluating the following bit of JavaScript with driver.execute_script().
const browser = document.querySelector(
  '#dialogOverlay-0 > groupbox:nth-child(1) > browser:nth-child(2)'
);
browser.contentDocument.documentElement.querySelector('#clearButton').click();
Finally, we dismiss the alert using standard Selenimum utilties for the task.
Test-Driving the Utility
Let’s verify that this works as expected by visiting a site which uses a liberal amount of caching, and then clearing the cache via the method above.
The script in this section visits overstock.com, goes to Firefox’s Browser Privacy page, then clears the cache and waits 10 seconds before quitting.
Installing Selenium and geckodriver
To run this script, you need to have Selenium v3.14.0 or above installed, as well as the appropriate version of geckodriver.
You can install geckodriver by downloading the binaries from their releases page, or if your’re on Linux, using your distribution’s package manager.
To install Selenium, you can just use pip.
I like to work in a virtualenv, which you can create and activate with
mkdir clear-firefox-cache
cd clear-firefox-cache
virtualenv env
. env/bin/activate
Install Selenium with pip install selenium in the virtualenv.
If you’re working globably and have Selenium installed, you can upgrade it with pip install -U --user selenium.
First, place the completed script from the last section into a file, say clear_cache.py.
Then, create a script named evaluate-clear-cache.py with the following contents.
from time import sleep
from selenium import webdriver
from clear_cache import clear_firefox_cache

# Start a firefox driver (make sure that geckodriver is running first)
driver = webdriver.Firefox()

# Visit a website that places data in local storage.
driver.get('https://overstock.com')

# Stay on the Privacy page for a few seconds to verify that the cache is not empty.
driver.get('about:preferences#privacy')
sleep(5)

# Clear the cache and hang around some more before quitting.
clear_cache(driver)
sleep(5)

driver.quit()
You can then run the script with
python evaluate-clear-cache.py
A Selenium-driven Firefox window will pop up, and you should be able to see that there are no cached resources from the interface.
Turning Off the Cache Completely
As a side note, note that it’s possible to completely turn off caching from the get-go by providing Selenium with a customized Firefox profile.
You can get the list of relevant preferences by browsing about:config in the version of Firefox you intend to use.
Then, you can manually construct a profile with the desired customizations.
from selenium.webdriver.firefox.firefox_profile import FirefoxProfile
from selenium import webdriver

profile = FirefoxProfile()
profile.set_preference('browser.cache.disk.enable', False)
profile.set_preference('browser.cache.memory.enable', False)
profile.set_preference('browser.cache.offline.enable', False)
profile.set_preference('network.cookie.cookieBehavior', 2)

driver = webdriver.Firefox(firefox_profile=profile)
Using 2 for the value of network.cookie.cookieBehavior is equivalent to never accepting cookies.
Conclusion
This post described how to clear the Firefox cache and cookies with Selenium.
On the way, we learned how to accomplish a few other tasks: click buttons, dismiss alerts, and deal with XUL’s browser elements when Selenium’s driver.switch_to_iframe won’t do the trick.
Here at Intoli, we specialize in browse automation and web scarping, and write about these topics on our blog.
If you like our posts, consider subscribing to our mailing list.
Suggested Articles
If you enjoyed this article, then you might also enjoy these related ones.
Breaking Out of the Chrome/WebExtension Sandbox
A short guide to breaking out of the WebExtension content script sandbox.

Recreating Python's Slice Syntax in JavaScript Using ES6 Proxies
A gentle introduction to JavaScript proxies where we use them to recreate Python's extended slice syntax.
Building a YouTube MP3 Downloader with Exodus, FFmpeg, and AWS Lambda
A short guide to building a practical YouTube MP3 downloader bookmarklet using Amazon Lambda.
Comments